htpowlasers's blog
Choosing between a fully assembled kids 3D printer or a kit depends on your child's age and experience level. Pre-assembly is a good option for children aged 10-12 as it gives them the opportunity to experience the printing process and start printing with a low barrier to entry.
The kit is a great 3D printer for kids aged 12+ who want to learn how a 3D printer works. This is best for older kids who already have some knowledge of the printing process and want to gain a deeper understanding. It's also best for kids who have some experience with advanced model kits, drone kits, or electronics kits.
Safety should be one of the first considerations when purchasing a 3D printer for children. While 3D printers are an amazing technology, they do pose some health and safety risks if used incorrectly. Hot parts like nozzles and heated print beds can pose a risk of burns, while certain materials like ABS can release harmful chemicals into the air.
These problems can be minimized or avoided by choosing the right machine and using it according to security best practices. The enclosures on children's 3D printers keep them away from the parts of the printer that are most likely to harm them.
Likewise, the print monitoring system gives you the peace of mind to keep your Longer LK5 PRO 3D printer away and let your children use it unsupervised.
While printing with high temperature filaments like PETG and ABS requires a heated print bed, you can also use it with low temperature filaments like PLA. Setting the heated bed to a low temperature can help PLA prints adhere to the bed better, which is great for kids who are still learning how to level the build platform and get good first layer adhesion.
One of the downsides of using a heated bed with kids is that it can present some safety hazards. Due to the larger size, it is much easier to accidentally touch the thermal print bed than the nozzles, so it is important to supervise young children when the thermal print bed is on.
While 3D printer enclosures are usually made to help prevent heat from escaping from the print area when using high temperature filament, they are an important safety feature for younger users.
Fully enclosed 3D printers prevent children from touching the nozzle or heated bed during printing, minimizing the chance of burns. It also minimizes fumes generated during printing to improve air quality.
Buying an enclosed 3D printer or adding an aftermarket enclosure is one of the best safety measures you can take when purchasing a 3D printer for a young child.
One great feature to look for when shopping for the best 3D printers for kids is print monitoring. This means that the printer is equipped with a built-in camera that you can use to remotely view the build plate during the printing process. In addition to being a good safety feature, watching the 3D printer at all times during the 3D printing process has some educational value for your child.
Remote print viewing means users don't need to be in the same room as the Longer Orange 4K Resin 3D printer to check print progress or check for errors. This also minimizes the risk of exposure to printer fumes, especially when using filaments with high VOC output, such as 3D printing nylon or ABS, which are not vented to the outside.
The ease of printer setup and 3D printing is one of the most important factors to consider when buying a 3D printer for children. Calibrating and troubleshooting a 3D printer can be frustrating even for adults, so kids who want to get good results easily can easily become overwhelmed by an advanced printer with many confusing features.
3D printers with simple touchscreen menus or apps to control are best for younger users. These printers have a much lower learning curve than 3D printers, which need to be fully controlled by a computer.
3D printers are excellent educational tools, which is one of the main reasons they are present in so many classrooms. They keep kids interested in the learning process and teach them 3D design and engineering skills.
For older kids, 3D printer kits are another way to add educational value to 3D printing, since they have to assemble all the parts correctly to use them. This allows them to better understand the printer and how it works.
When purchasing a Longer LK4 X 3D printer for a child, it is important to consider the printer's maximum build volume and what the child in question will want to print. The smaller build volume is perfect for younger users making their own toys and other small items, as it is easier to get good bed level and first layer adhesion with a smaller bed.
If the 3D printer is mainly used for 3D printing cosplay armor, 3D printing helmets, props, educational models and other large models. Larger prints can be made on small build plates by printing them in several pieces and gluing them together, an extra step that might frustrate even older children.
Laser cutters are now easier than ever to use. If you run a small business, investing in one is a great idea. Laser cutters and engravers offer precision, accuracy and repeatability that hand tools cannot match.
If you think the cost of a laser cutter will exceed your budget, don't worry. While high-end machines cost $5,000 or more, you can find good budget options around $500.
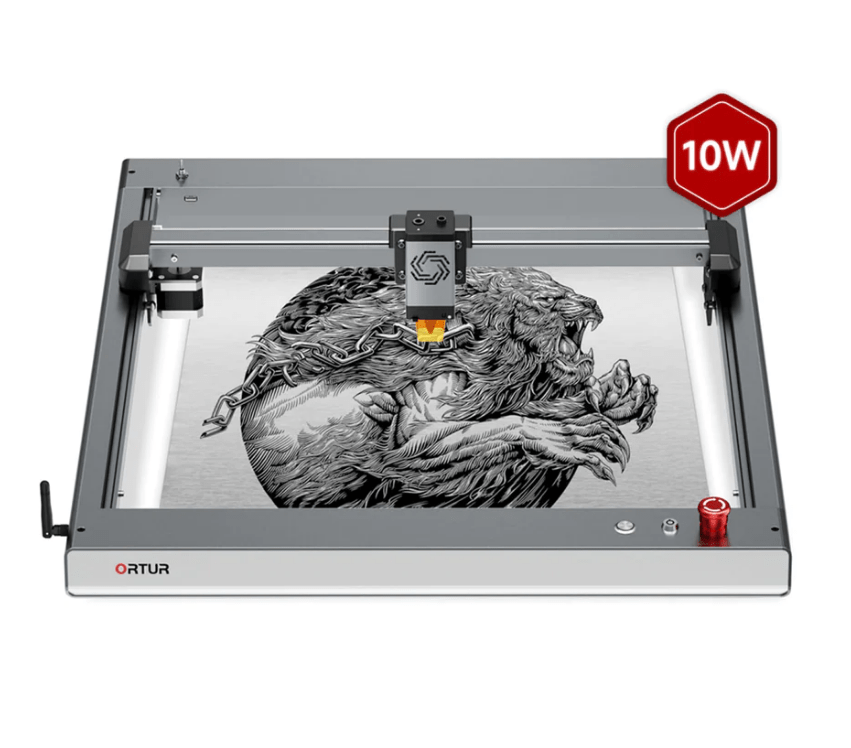
For example, our top pick, the Ortur Laser Master 3, is the best laser cutter for small businesses at a relatively affordable $599. It is the ideal tool to enter the world of laser cutting. Later, you can transition to a CO2 laser cutter with higher power and speed capabilities.
No matter how powerful the laser cutting machine is, as long as the quality is good, the machine will soon pay for itself. From engraving to cutting, it can help you make a variety of products.
Let's take a look at our top picks and review the best tips to consider when buying a laser cutter for your small business!
Ortur's laser cutter is the best laser cutter for small business due to its low price and great performance. The Ortur Laser Master 3 is no exception, offering upgraded laser performance that is even better than its predecessor, the Ortur Laser Master 2.
Ortur includes a premium 10W laser module capable of engraving and cutting a variety of materials including wood, leather and plastic with a small spot. This delicate balance of power and precision helps you sculpt intricate details on materials with ease.
Focusing on user safety, the Laser Master 3 features a secure lock key system with active position and slope detection and an emergency stop button. These features are hard to find in cheap laser cutters, but can be helpful in an emergency.
Ortur already supports LM3's Laser Explorer application. You can easily engrave any design or picture and control every aspect of the machine through this mobile app. In addition, the device is compatible with other laser cutting software such as LightBurn and LaserGRBL.
However, perhaps because of its app functionality, Ortur doesn't include physical control buttons on the laser cutter. This may restrict some users. Although this machine has an integrated air assist system within the laser module, it also does not include an air assist pump.
All things considered and minor inconveniences, Ortur's Laser Master 3 is arguably the best laser cutter for small businesses. Even with small batches of laser cutting, you can quickly recoup your initial costs and start turning a profit right away.
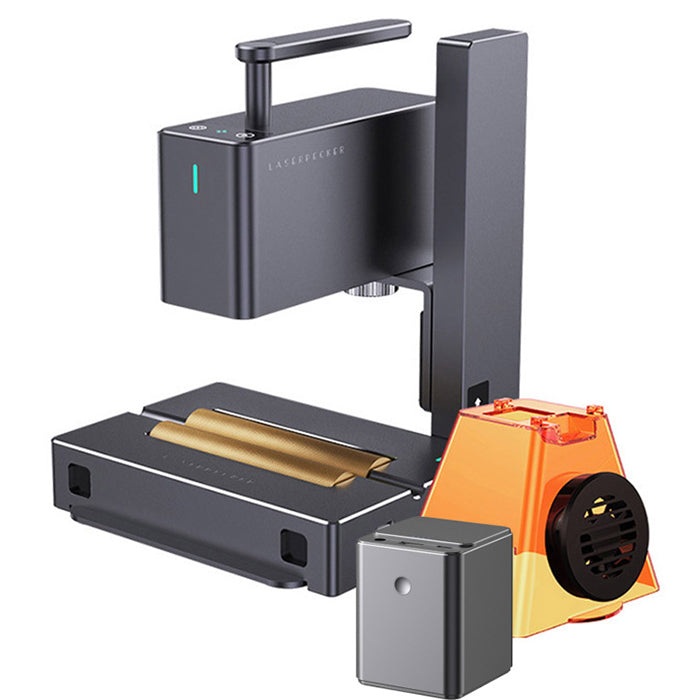
LaserPecker lasers are among the top handheld laser cutters you can find today. They're small, portable, and offer powerful performance in a compact form factor. The LaserPecker 3 is no exception. It follows in the tradition of its predecessors by giving you the option of engraving on metal surfaces.
The LaserPecker 3 weighs only 2.5 kg (5.5 lbs) and has an excellent build quality that matches its design. You can connect it to an external battery and get 4 hours of laser engraving time, allowing you to really enjoy the benefits of a portable laser engraver.
It has a 10W laser module with a fixed engraving area of 60 x 60 mm. Since it's a handheld laser, you can quickly reposition it and expand your work area. The galvanometer arrangement inside the laser module helps you achieve high engraving speeds up to 600 mm/s while maintaining a sharp 0.01 mm laser beam spot.
The LaserPecker 3 comes with its companion app, which allows you to control the machine using your laptop or smartphone. You can create designs from scratch, or engrave existing images onto workpieces directly from the app.
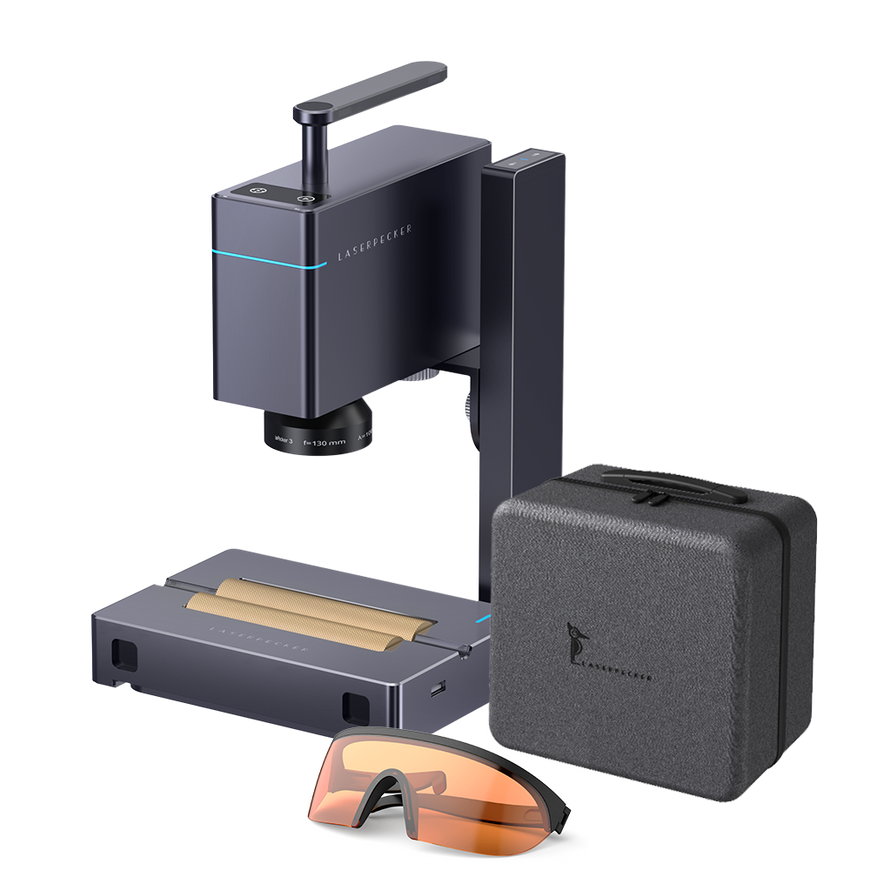
The main disadvantage of LP3 is its relatively high laser power. While its portability is a plus, better and more powerful laser engravers can be found in its price range.
However, for the business owner or hobbyist, the LaserPecker allows them to bring their laser cutter to the actual job site. This mobility factor, combined with the potential for engraving on metal, is enough to justify its nearly $1,500 price tag, making it the best laser cutter for portable workflows.
This compact laser engraver is characterized by engraving cylindrical materials, which sets it apart from other engravers. It has unparalleled advantages, and its precision and speed are at the top level in the industry.
The LaserPecker 2 is a compact laser engraver designed for shops and businesses with engraving needs for many cylindrical objects. It is a powerful machine with ultra-high working speed, ultra-high engraving precision and ultra-portable. This engraving machine is made of aluminum profile frame, which is strong and durable. It launched on March 2, 2022, and has quickly become a popular choice for businesses.
If you want more information on laser engravers other than LaserPecker machines, read our Laser Engraving Machine Buying Guide.
The LaserPecker 2 is a compact laser engraver with several features that set it apart from other engravers on the market. One of the most notable features is its connectivity options, including WiFi and USB. This allows users to easily connect the laser engraver to various devices, making it more versatile and user-friendly.
In terms of speed, the LaserPecker 2 is also impressive. The speed is 36000mm/min, and the preview speed is 3750mm/s, which is super high and ensures high-efficiency engraving. This means the machine can engrave quickly and efficiently, saving users time and increasing productivity.
The engraving area of LaserPecker 2 is also impressive, with an area of X100*Y2000mm. That's enough for most engraving needs, making it a versatile tool for businesses requiring engraving services.
Another notable feature of the LaserPecker 2 is its rotation, a 360° versatile drum motor. This feature allows to engrave cylindrical objects, which is a unique feature unmatched by other engraving machines. This makes the LaserPecker 2 ideal for businesses that need to engrave cylindrical objects such as bottles, mugs and pens.
LaserPecker 2 also has an impressive 168H continuous working time, ensuring uninterrupted engraving. This is especially useful for businesses that need to engrave a large number of items in a short amount of time.
In terms of security features, the LaserPecker 2 is equipped with a protective cover, goggles, combination lock, tilt protection, overheating protection, and more. These safety features ensure safe machine use and prevent accidents. A protective cover and safety goggles protect the user from laser radiation, while a combination lock prevents unauthorized access to the machine. Tilt protection and overheating protection functions ensure that the machine can be used safely even in the event of a malfunction.
LaserPecker 2 is compatible with a wide range of software including AI, BMP, JPG, PNG, DXF, SVG, G-Code, CDR and DWG. It is also compatible with LightBurn and LaserGRBL which are all compatible with Windows XP to W10, Linux and Mac OS. However, it is not compatible with Benbox, GrblController, LiteFire or any other software.
The LaserPecker 2 has a number of advantages that make it an excellent choice for businesses requiring mass customization. One of the machine's most notable strengths is its unrivaled cylindrical material support. This feature sets it apart from other engraving machines on the market and makes it ideal for businesses that need to engrave cylindrical objects such as bottles, mugs and pens. The machine's swivel capability allows it to engrave cylindrical objects with ease and precision, making the LaserPecker 2 an invaluable tool for businesses requiring engraving services.
In addition to cylindrical material support, LaserPecker 2 also has super high working speed and super high engraving precision. This ensures that engraving is efficient and of the highest quality, saving businesses time and increasing productivity. The speed and precision of the LaserPecker 3 make it an invaluable tool for businesses requiring engraving services, such as the promotional product industry.
Another advantage of the LaserPecker 2 is its portability. The machine is compact and light in weight, easy to move and use in different places. This feature makes it ideal for businesses that need to engrave objects on-site, such as at a trade show, event or at a client's location. The portability of the LaserPecker 2 allows businesses to provide engraving services in different locations, making it a versatile and valuable tool.
The safety features of the LaserPecker 2 are also a plus. The machine is equipped with protective cover, goggles, password lock, tilt protection, overheat protection. These safety features ensure safe machine use and prevent accidents. A protective cover and safety goggles protect the user from laser radiation, while a combination lock prevents unauthorized access to the machine. Tilt protection and overheating protection functions ensure that the machine can be used safely even in the event of a malfunction.
The LaserPecker 2 has some drawbacks that you should be aware of before purchasing. First, it has few compatible software options, which may be a limitation. This means you may need to purchase additional software to use with your engraver, which adds to the overall cost.
Second, the LaserPecker 2 is pricey and may not be suitable for businesses on a tight budget. However, if you can afford it, the benefits of the machine may outweigh the cost.
Overall, the LaserPecker 2 is a powerful and efficient compact laser engraver ideal for businesses requiring mass customization. Its cylindrical material support, ultra-high working speed, and ultra-high engraving accuracy make it the first choice for merchants who need to engrave cylindrical objects. Its security features and portability make it easy and safe to use. Despite its high price and few compatible software options, the benefits of this machine probably outweigh the cost. If you're in the market for a compact laser engraver, the LaserPecker 2 is definitely worth considering.
If you are in the market for a compact laser engraver, HTPOWLASERS is a great place to start your search. HTPOWLASERS is a website that sells various brands of laser engravers, including the LaserPecker 2. Our wide selection of products makes it easy for you to find the right engraving machine for your business needs.
Visit our website to learn more about their products and find the perfect laser engraving machine for your business.
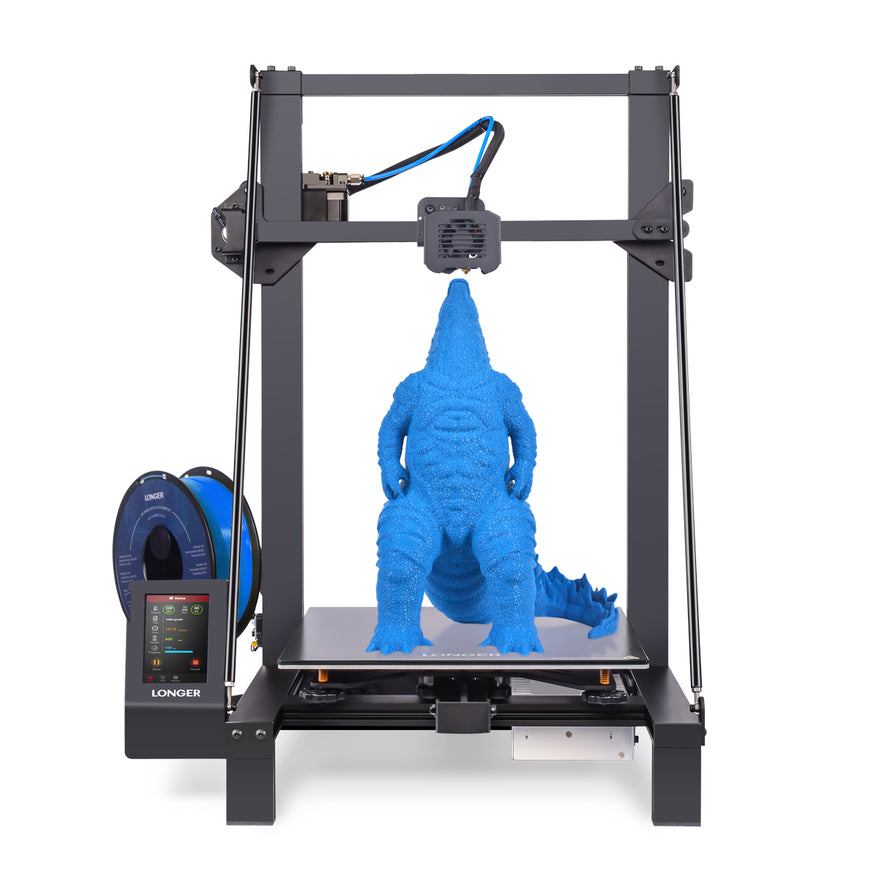
The Longer LK5 Pro is currently the Shenzhen-based manufacturer's flagship FDM 3D printer, and it's one of the fairly affordable devices that promises to offer a similar experience to pricier 3D printers. And, to my surprise, the combination of simple design and thoughtful functionality works really well for Longer. In fact, after some basic adjustments, I got some very good benchmark print results that compete with pricier printers.
You need to keep in mind, though, that while it's not very difficult to assemble, you'll need over an hour to put everything together, and it will require some fine-tuning that I'm not entirely sure will make the complete assembly be complete. Beginners are happy.
This is true for the entire 3D printing industry as it hasn't figured out a way to make things easier for new users - I know most people just want to take their printer out of the box and start printing without any adjustments.
I also know that people interested in 3D printing won't be turned off by a little tweaking, and the Longer LK5 Pro does offer the user a color touchscreen LCD that works well, along with a heated bed and a bonus feature. The glass bed, and the manufacturer also added some stabilizer bars to help reduce vibration. Furthermore, the device comes with an open-source motherboard, so it's easy to upgrade the LK5 Pro to your liking. That being said, let's examine the Longer LK5 Pro a little deeper and see if it can be considered the best 3D printer in its price range.
Design and Build Quality
The extended LK5 Pro isn't a successor to the regular LK5, as the manufacturer prefers to use the word Pro to mean using the same color LCD and larger bezel as the LK4 Pro. Obviously there's some marketing crap going on here too. Anyway, the 3D printer is larger than both the LK4 and LK4 Pro when fully built, measuring 22.8 x 21.2 x 26.1 inches (58.0 x 54.0 x 66.3 cm) and weighing 29.8 lbs (13.5 kg), so yes, you do need to Plan where it will be placed as it does take a lot of space. The good news is that the print measures 11.8 x 11.8 x 9.8 inches (30.0 x 30.0 x 40.0 cm), so you can create very large models.
The 3D printer comes partially pre-assembled, since the PSU+ mount connects to the X-axis arm and extruder, so you have to assemble everything else. Inside the package you will find a tall gantry, screw rods and support beams. Due to the taller profile of the Longer LK5 Pro, these beams were necessary to limit vibrations. They do work as expected, but there are a few factors that can cause vibrations, as you'll see in the sections below.
The manufacturer also installed a screw bearing bracket to help hold the screw in place, an upgrade over the exposed Lk4, along with a Z-axis motor, a limit switch, a filament holder, and a touchscreen display.
Additionally, Longer has added a plastic strain relief bracket that you can mount underneath the heatbed and help support the PSU cable. Almost everything is made of metal, with the exception of a few elements, such as the filament holder, which has proven strong enough to hold a heavy coil of filament. The hotbed is made of metal and can reach a temperature of up to 100 degrees Celsius (212 degrees Fahrenheit), however, since it is not insulated, it will take longer to heat up. I also need to mention the extra glass bed you can put on top of the hotbed, which is a great addition, as it's much easier to disassemble the models this way (no forceful removal, they just pop off). The surface is also much more uniform when working with glass, as evidenced by calibration (manually, with a piece of paper). I know some of you might like to see a print room, but that's still out of the question at this price point.
You do get the triangular design, and I do like that the teflon tubing from the extruder to the hot end can handle temperatures up to 280 degrees Celsius (536 F), but note that only supports temperatures up to 250 degrees Celsius (482 building). Another cool element is the filament end sensor, which automatically pauses printing if it detects that the filament is out, then resumes printing after you add the filament back in. The same is true when power is lost, so you don't have to worry about restarting printing, as the Longer LK5 Pro will pick up where it left off when power is restored. I wasn't too sure about the hot end fan duct at first, as it's pretty much the same as the one on the LK4 Pro, but it seems to perform well. You always have the option to print an upgraded version of it, so you can improve it if you get stuck.
The first thing out of the box is the gantry, along with the screw and two support rods. Then there's the spatula, card reader, and microSD card - when you remove this part, be aware that the glass bed is not attached to the assembly, so it could fall and shatter (we don't want that). The rest of the 3D printer is almost pre-assembled, but there are some important parts that need to be added. Before installing anything, I flipped the pre-assembled part of the printer over, and as you can see, the longer plastic feet can (and should) be replaced with silicone feet. The plastic feet are useless for jerks or shocks, while the rubber feet do a good job of absorbing some vibrations.
Then there's Cheng Liang's P360W24V power supply, which is a fairly generic power supply, but should work just fine. Fans have always been a weak point of Longer 3D printers as they can be very loud, the LK5 Pro does have three fans (in addition to the PSU fan) - one on the base of the frame and two on the end of the X-axis beam (for the hot end).
Interestingly, the fans aren't as loud as on the LK4 (the LK4 pushes the 12V fans to 24V), by far, but they're still the easiest part to hear as the Longer makes pretty much everything else quiet - except Exception for extruders. To see why, I decided to open up the main section and had to remove quite a few screws using one of the provided Allen keys. With that, I can see that the LGT_KIT_V1.0 board has three detachable silent steppers (TWC2208) with a small heatsink on top, and the processor is an 8-bit Arduino ATMEGA2560. The extruder does have a different stepper driver (as I expected), and it's not the silent type (couldn't recognize it), but the good news is that you can replace it if it bothers you.
If you look around the PSU you'll find a sticker with instructions to switch between 230V and 115V depending on your country - since I'm in Europe at the time of writing I set the switch to 230V , which is the default, but I know that in the US, you need to change it to 115V.
Once finished, you can start the assembly, according to the instructions on the box, we need to pass the X-axis beam through the gantry rod, and then turn the assembly screw into the X-axis beam dedicated brass nut. Next, I took the X-axis motor and two M4*16 screws, and screwed the motor to the gantry. I then inserted the lead screw into the top of the motor and after unscrewing the coupling's screw the lead screw slid in. Now you can adjust the height of the X-axis beam. The next step requires four M5x20 screws that you will need to secure the gantry to the base. Accessing it from the bottom is very difficult, so it's best to set the whole assembly aside so that the screws can be easily inserted into place. Now it's time to add the support rods, for this you need to use four M4*8 bolts and make sure there is a 90 degree angle between the gantry and the base. I needed to adjust the support rods a bit as the angles were really off, which is absolutely necessary if you are using four bolts to connect two tall columns.
After finishing, use two M4*16 and two M5*20 bolts to connect the limit switch and the filament holder. The limit switch is on top to hold the screw in place and the filament holder is on top of the printer beam. I was a bit surprised by the filament holder on the Selpic Star A Mini 3D printer, but here it seems to be a bit more solid, despite also being made of plastic. After that we need to install the display, the area where the display needs to be added is very obvious as it is the only part where the aluminum is exposed. So take two M5*6 bolts to attach the display and attach the Z-axis limit switch near the X-axis motor. Next we need to connect all the wires so connect the Z cable to the Z axis limit switch, another Z cable with more pins to the motors and the LCD cable to the back of the display. A thick PSU cable connects to the back of the metal bed, then an E-cable with more pins is added to the extruder block, and another E-cable goes to the filament detector. The other two X cables go to the motor.
We're not done yet, as you'll need to use the wrench provided to stabilize the bed. There are three screws underneath that need to be tightened (or loosened) so that the bed loses the rocking effect - use the moving plastic wheel to get a feel for the screws. Now it's time to adjust the heat bed - to do this, turn on the printer (turn it on) and tap the "Leveling" tab on the display. You will now see five points and you will need to click on each one at a time and adjust the wheels from under the bed until all five parts allow you to move a piece of paper with just a little resistance.
It's important to know that you have to go to 4 and back to 1 several times until the seedbed is properly leveled, and yes, this can take quite a while (I played about 20 minutes). I've noticed that the spring quality is good, but the knob could be bigger as it's not easy to move and adjust - you can print new knobs now. Before you start printing anything, it's also a good idea to check that the X-axis motor is moving smoothly, if not, take a wrench and adjust the screw from under the motor.
The Longer LK5 Pro does have the same color display as the LK4 Pro, and it's still pretty good. It's a touchscreen, so no buttons, and generally very responsive, except in areas where some tabs are too narrow - so I had to try two or three times to get the right area. Other than that, the LCD screen is fast and responsive. Immediately after powering on the 3D printer, the display will show six tabs, the first tab is called "Move", which essentially allows you to manually move the hot end (you can also return it to the main position), and the second The second tab is "File". Here you can see all printable 3D models. This only happens if you have inserted a microSD card or connected an external drive or computer to a USB port.
The third tab allows you to adjust the LK5 Pro (bed and nozzle temperature, fan speed, flow, and nozzle flow), while the fourth tab allows you to add or remove filament, as well as select the type (it works with ABS and PLA use). The last two tabs can be used to level the hotbed and check some info about the Longer LK5 Pro.
The cool thing is that you can adjust your print from the LCD display without having to re-slice the model again like you do with other cheap 3D printers.
The LaserPecker is a compact, versatile laser engraver perfect for beginners and professionals alike. It's very easy to use, with a user-friendly interface that allows you to quickly and easily set up your project and start sculpting. Lasers are powerful and precise, making them ideal for engraving a wide variety of materials, including some metals, wood, leather, paper, and more.
One of the outstanding features of the LaserPecker is its portability. It is small in size and light in weight, so you can carry it anywhere. This makes it ideal for those who need to work on projects in different locations, attend a lot of trade shows or expos, or just want the flexibility to work on projects anytime, anywhere.
LaserPecker 2 is a complete redesign of LaserPecker 1. This laser includes a protective cover for more versatility. It also comes with a host of accessories and extras to make it even more versatile. For example, it comes with a focusable lens that allows you to adjust the focus of the laser for different materials and projects, and it also has a swivel attachment that allows you to engrave on cylindrical objects like mugs and bottles.
They now have the recently released LaserPecker 3. It starts at around $1,799 and is a lot more powerful than its predecessors. Some key features are:
The LaserPecker 3 is a fiber laser engraver that can be used on a wide variety of metal and plastic materials without any pretreatment. It features an ultra-fine 0.01mm x 0.01mm compression point for detailed, vivid engraving at 4K resolution. With its innovative galvo technology, the LaserPecker 3 can engrave at an impressive speed of 48000 mm/min.
Dual infrared light positioning design, easy and precise focusing, and the electric bracket can be adjusted for objects of different heights.
The multi-function base includes a positioning plate for efficient batch engraving, and the base can be removed for engraving tall objects or for handheld use.
The LaserPecker 3 laser engraver is easy to set up and use, requiring no complicated assembly. It can be connected to a smartphone or PC and supports various file formats.
The company backs the product with a 12-month warranty and offers live chat support for any questions or issues during usage.
One of the reasons I really like the Laser Woodpecker is that it's very affordable. It's worth the money and offers many features and functions that are usually only found on more expensive laser engravers.
Overall, I highly recommend LaserPecker to anyone looking for a powerful and versatile laser engraver. It's easy to use, portable, and affordable, making it perfect for beginners and professionals alike.
Sculpfun S30 Ultra Laser Engraver and CutterAre you looking for high quality laser engravers and cutters for your business or personal use? Sculpfun S30 Ultra 22W Laser Engraver and Cutter is your best choice.
11W, 22W, 33W power options
The S30 Ultra laser engraver and cutter is available in three different power options: 11W, 22W and 33W. Each power option has its own unique advantages and benefits, depending on your specific needs. The 11W option is great for those who want to light sculpt on materials like wood, leather and plastic. The 22W option is great for those looking to machine thicker or harder materials like metal or glass. For those who need maximum power and speed, the 33W option is the sweet spot. No matter which power option you choose, the S30 Ultra is a versatile and powerful tool that will take your crafting game to the next level.
Enhanced 42-bit stepper motor and replaceable protective lens
The S30 ultra laser engraving and cutting machine is equipped with an enhanced 42-bit stepper motor, which can provide enough power for the machine to move at high speed. The torque reaches 4.2 Kg·cm, which is higher than most common machines. In addition, the laser adopts an innovative replaceable lens, which greatly improves the service life of the laser. One free lens is included in the package, replacement lenses are cheap and easy to buy from Sculpfun.
Built-in high-pressure air-assisted nozzle, upgraded 32-bit air-assisted main board
The Sculpfun S30 super laser engraving and cutting machine is equipped with advanced high-pressure air-assisted metal nozzles, which generate high-pressure airflow under the action of the air pump, which greatly improves the cutting efficiency. Powerful airflow blows away residue, leaving a clean cut surface. The latest 32-bit motherboard supports automatic air-assisted control function and wireless Bluetooth connection, making it easy to control the machine remotely.
Industrial grade cutting precision and detachable laser eye shield
S30 ultra-laser engraving and cutting machine adopts extremely strong 0.005mm high-precision linear slide X-axis to achieve industrial-grade engraving precision. When comparing small engraving details, the S30 Ultra does not have the wavy patterns that appear on ordinary engraving machines. It also features a detachable glass goggle, eliminating the need for glasses while using the machine.
Strong and durable frame, large engraving area
S30 ultra-laser engraving and cutting machine is made of high-strength aluminum alloy, and its frame can withstand a weight of up to 50KG without damage. The frame can be used for a long time and maintain high precision.
large engraving area
The S30 Ultra has a large engraving area of 600x600mm, allowing you to work on larger projects without breaking them into smaller parts. This saves you time and effort and ensures that you can achieve your desired design without compromise.
Laser Information and Machine Information
The diode laser output power of S30 super laser engraving and cutting machine is 11W, 22W, 33W, the laser focus is 0.06x0.08mm, the laser wavelength is 455±5nm, and the focusing method is fixed focus column + sliding device. The engraving accuracy of this machine is 0.005mm, and the power is about 84W. The air pump is 24V, 30L/min, airborne control type, and the inner diameter of the air pipe is 7.5mm. The power input power is 100-240V AC, 50/60HZ, and the output is 24V 7A. The machine can engrave and cut a variety of materials, including wood, MDF, stone, cardboard, plastic, leather, PCB board, alumina, 304 stainless steel, ceramics, etc.
Powerful stepping motor
Powering the S30 Ultra is a 42-position stepper motor, providing enough power for the machine to move at high speeds. With a torque of 4.2 Kg cm, this laser machine can handle even heavy-duty projects with ease.
wide range of engraving materials
The S30 Ultra can engrave a wide variety of materials, including all types of wood (including high-density wood), MDF, stone, cardboard, plastic, leather, PCB board, aluminum oxide, 304 stainless steel, ceramic and dark stone. It can also cut various materials, such as wood (including high-density wood), MDF, acrylic board, cardboard, non-woven fabric, bamboo chips, leather, some plastic boards, PCB boards, etc.
Laser Protection Cover
The S30 Ultra features a removable laser shield to keep you safe while you work. The protective cover can protect your eyes and skin from direct contact with the laser beam and prevent any accidents.
User-Friendly Design
The S30 Ultra has been designed with user-friendliness in mind, with an easy-to-use control panel and simple installation process. It comes with an instruction manual and a step-by-step installation package, making it easy to set up and start using it right away. The laser also supports Bluetooth wireless connectivity for easy operation with your smartphone or tablet.
If you want to unleash your creativity, the S30 Ultra laser engraver and cutter can meet your needs. This laser combines power and versatility with a large engraving area and the ability to handle multiple materials. Whether you're new to your craft or a seasoned pro, the S30 Ultra is the ultimate tool to up your game. What are you waiting for? Get it today and start bringing your wildest ideas to life!
There's nothing more pleasurable and satisfying than making stuff. Getting the job done takes time, energy and the right tools. For laser engraving, Lange's B1 30 watts provide plenty of power for the project to go, but for heaven's sake, be careful! It's a beast!
The Longer B1 is a 30+ watt laser mounted on a software controlled X/Y axis gantry positioning system for engraving and cutting a variety of materials.
Design and Features
The Longer B1 laser engraving machine comes in a large box. I'm glad to see they're doing a great job of keeping their content safe. At first, assembly can seem a bit overwhelming as there are so many bits and pieces, but don't worry.
Comes with TF card and USB adapter, which contains manual, LightBurn and LaserGRBL software, material configuration files, and some test files. LightBurn is paid software with a 30-day free trial. I have a license, so I use it for testing.
Assembling the Longer B1 30W laser engraver is not difficult. The quick start guide does a commendable job of illustrating the process. For convenience, there is also a playboy assembly video on the TF card! Includes assembly tools. I'm impressed that there are only 12 bolts, two straps, two switches, and 7 quick connectors to assemble. The whole process took less than an hour. Once you're done, everything is tight.

Limit switches are attached to the X and Y brackets.
The Longer B1 laser engraver has a huge engraving area of 450 x 440mm.
The laser slides onto rails on the X-axis and is held in place by small diameter thumbscrews, allowing the Z-axis focus to be adjusted. I'd like to see a larger, more accessible method of mounting. That being said, it works and I have had no stability issues.
The feet feature level adjustment.
The air assist pump plugs into the side of the laser module, and the air tubing runs along the same path as the wiring. There is an inline valve to reduce the flow if necessary, but there are several warnings in the literature not to close it or the pump will be damaged.
Before going any further, I must emphasize that the Longer B1 laser engraver is a tool. It is not a toy and may seriously injure you, children or pets, so it should be used with extreme care. This is Category IV, which is defined as "both direct and diffuse radiation considered to be a serious hazard to the skin and eyes." The stray light emitted by the B1 contains so much UV radiation that even a brief exposure can make your eyes feel like there's sand in them . Taken to the extreme, the possibility of permanent blindness is very real. Please don't take any chances. Everyone in the room should wear goggles at all times. You wouldn't let your kids frolic on the roof, or your kitty around the lit stove, would you?
Even more notably, the Longer B1 laser engraver also packs enough punch to inflict severe burns and catch fire quickly. Always maintain adequate ventilation, keep away from flammable materials, be vigilant when handling, and have a fire extinguisher handy. A lack of diligence can lead to plenty of disasters, or at least awkward conversations with doctors, firefighters, law enforcement, or insurance agents. No, I'm not exaggerating. handle it seriously. I've tested the flame detector on several occasions and it's very sensitive, but I wouldn't risk my house.
For extra protection, Lange has wisely installed keyed switches on the control module. Store your keys in a safe place the same way you store your lawn mower, car and storage room keys with a pointed tool. Also connected to the switch are power button, run box button, indicator light, TF card slot, touch screen port, USB-B socket and power socket.
If the optional touch screen is not available, the mechanism for communicating directly with the Longer B1 laser engraver is through the MKLaserTool software or the MKlaser app. Both are simple and well documented in the manual, and connect via WiFi. I'm not used to operating something as powerful as the B1 wirelessly, so I'll stick with the LightBurn's direct USB connection.
If anything happens, press the emergency stop button.
The power supply is a laptop-style brick.
Use a small lever pivoted from the back of the laser to set the focus. Attaching it is ideal for preventing loss.
I had no issues setting up the B1's parameters in LightBurn, and it was up and running in just a few minutes using 4mm Basswood and the test files provided by Longer. A setting of 5000mm/min, 20% power produces deep engraving.
I used their "cat" (paw print) and "bird" test files using 5000mm/min at 50% power and 10,000mm/min at 20% power and the results are shown in the graph below. It's a powerful laser!
The Aloalo pictured below cuts at 6000mm/min at 10% power and makes four passes at 2500mm/min at 100% power.
In general, air assist helps to blow some of the fumes away from the workpiece, thereby reducing scorching. Lange's system works well and has improved significantly, but I think more traffic could make it even better.
So, what does 30 watts of power do? I've used a 10 watt laser and it's great for light wood, acrylic, and fabric, but the Longer B1 laser engraver is on another level. Higher power means shorter project times and the ability to cut thick materials and etch metal with ease. The plate is a coated steel plate.
As you can see the laser caused the sheet to warp. This is not the fault of the Lange B1 laser engraving machine. I need to make better choices about what I'm using.
Longer provides a PDF of recommended cutting and etching parameters, which is a good starting point, but as with any machine, some tweaking and refinement will be required to bring up the best settings.
I have used laser engravers in the past, but nothing can match the speed and power of the Longer B1 30 Watt Diode Laser Engraving Machine. Similar projects that would have taken hours took a fraction of the time, I love air assist for less scorching, but caution should always be used when using this amazing tool. I have many projects waiting to be worked on.
Recommended by other brands: LaserPecker , Atomstack , Ortur , Sculpfun , TwoTrees
As a dedicated metal worker, I know how important it is to have the right equipment to achieve the desired results. A laser engraver for metalworking is one of the essential instruments in my arsenal. With this adaptable tool, I can easily draw intricate and detailed designs on metal surfaces. However, finding the best laser engraver for metalworking can be challenging. To help you find the ideal laser engraver for your metalworking needs, I've created this helpful guide.
Before delving into the intricacies of choosing the best laser engraver for metalworking, it is crucial to have a basic understanding of the different types of laser engravers available. Generally speaking, there are two main types of laser engravers: CO2 and fiber optic. We've covered this topic before in our laser engraving machine buying guide, and it's comprehensive enough to give you everything you need.
A CO2 laser engraver produces a focused beam of light that is then shone onto the material to be etched. These special laser engravers are great for objects like paper, plastic, and wood. Since CO2 laser engravers are less expensive than fiber laser engravers, they are often chosen by hobbyists and small businesses. They can create various engraving depths and are ideal for engraving on curved surfaces.
On the other hand, fiber laser engraving machines are more suitable for processing metal materials. They produce significantly higher beam power than CO2 laser engravers, making them more efficient at engraving metal. This type of laser engraver is ideal for engraving on metals such as stainless steel, aluminum, and copper. Fiber laser engravers are more expensive than CO2 laser engravers, but they last longer and require less maintenance. They also offer greater precision and fine detail work, making them the first choice for industrial applications.
Now that you know about the different types of laser engravers, it's time to consider the most important factors when choosing a portable laser engraver for metalworking.
Laser power is one of the most important factors to consider when choosing a laser engraver for metalworking. The depth and speed of engraving are affected by the laser power. Higher laser power can achieve faster engraving speed and deeper engraving. Finding the ideal balance between power and affordability is critical, as increased laser power also means higher price. Look for laser engravers with a minimum power of 30 watts for metalworking.
The bed size of your laser engraver is another important factor to consider. The size of the bed determines the maximum size of the metal piece you can carve. If you plan to use larger metal pieces, you will need a laser engraver with a larger bed size. However, larger bed sizes also mean higher prices, so it is important to consider the size of the metal pieces you will be using before making a purchase.
The software that comes with your laser engraver is also an important factor to consider. This software controls the laser engraver and allows you to create designs and patterns. Look for software that is easy to use and has a wide range of features. Some laser engravers come with proprietary software, while others use open source software that is freely available online.

When buying, price is always an important factor to consider. Metalworking laser engravers can range in price from hundreds to thousands of dollars. While considering the other aspects mentioned above, it is crucial to have a budget and stick to it. While you shouldn't waste features you don't need, you shouldn't skimp on features that are critical to your project's success either.
Laser engravers generate a lot of heat and require a cooling system to prevent the laser from overheating and damaging the machine. There are two types of cooling systems: air-cooled and water-cooled. Air-cooled systems are less expensive, but not as effective as water-cooled systems, especially when using high-power lasers. Water cooling systems are more expensive, but they provide better cooling and help extend the life of the laser tube.
Durability is another important factor to consider when choosing a laser engraver for metalworking. Look for a machine that is made of high-quality materials and has a solid design. A durable laser engraver lasts longer and requires less maintenance, saving you time and money in the long run.
The intense beam emitted by the laser engraving machine may damage your skin and eyes. You should look for a machine that has safety features like a shield or goggles. High quality materials should be used to construct the shielded enclosure, which is intended to protect the user from inadvertent laser beam exposure.
Finally, consider the level of customer support offered by the manufacturer. Look for a manufacturer that offers great customer service and technical support. A good manufacturer will provide training, troubleshooting help, and a warranty for their machines.
By considering these additional factors, you can find a laser engraver for metalworking that offers the performance, safety, and durability you need to achieve your metalworking goals.
Finding the best laser engraving machine for metalworking can be a challenging task. However, by considering the basics, you can find the perfect machine for your needs. When looking for a laser engraver for metalworking, it is important to consider laser power, bed size, software, price, cooling system, durability, safety features, and customer support.
In my opinion, fiber laser engraving machines are the best choice for metal processing. It produces the best results and lasts longer than a CO2 laser engraving machine when working with metal materials. Look for a fiber laser engraver with a bed sized for the metal parts you'll be working on and a minimum laser power of 30 watts. The effectiveness of the cooling system and the availability of the software should also be considered.
At htpowlasers, we understand the importance of finding the perfect laser engraving machine, which is why we offer a wide range of high-quality machines from different brands. The selection of htpowlasers is carefully curated to ensure we only supply the best machines that meet our high quality and performance standards. htpowlasers laser engravers are available in different sizes, laser powers, bed sizes and software options, including proprietary and open source software, making it easy to find the perfect machine for your metalworking project.
If you're considering starting a small business or pursuing a side hustle in the world of laser engraving, efficiency is undoubtedly a crucial factor to consider. At LaserPecker, we prioritize efficiency, and that's why we have developed our innovative button and thoughtful designs specifically for batch engraving.
In this blog, we aim to showcase the remarkable accessories designed for our laser engraving and cutting machines—the LP2 & LP3 models. Additionally, we will highlight the benefits of these accessories, which significantly contribute to improving efficiency. This comprehensive guide will assist you in using these accessories effortlessly and unlocking your creative potential for your artistic endeavors.
Batch Engraving Button
This device is designed for high efficiency and flexibility, instead of engraving or cutting individual products separately, try batch production of multiple identical products on the same material. By eliminating the need for repeated parameter settings, it saves you valuable time and energy while greatly increasing production efficiency.
Simple steps to batch working:
Seamless Connectivity:
Start by connecting the batch engraving button to the laser head using a USB cable, specifically a Type C connector.
Convenient Button Attachment:
The batch engraving button can magnetically attach to and detach from the laser head's handle with ease, adding a level of convenience to your workflow.
Wireless Control:
Connect the device to your LaserPecker App via Bluetooth. This connection allows for seamless control and access to advanced settings.
Unlock the Button Functionality:
By accessing the "Settings" icon in your LaserPecker App, navigate to the "Mode Settings" and enable the "Button Unlock" feature.
Effortless Preview and Engraving:
Select the pattern or image you wish to engrave and initiate the first trial. To preview subsequent engravings, simply give the button a short press. End the preview mode with another short press. When you are ready, long press the button for 2-3 seconds to begin the engraving process. Pause the engraving with a single short press, and end it with another long press for 2-3 seconds.
Adjustable Alignment Fixtures on Base Plate
On top of these impressive features, the LaserPecker 3 offers adjustable alignment fixtures on its base plate, setting it apart from its predecessor LaserPecker 2. The removable base plate of the LaserPecker 3 boasts several arrays of thoughtfully designed holes. These holes serve a magical purpose - they accommodate adjustable alignment fixtures, taking batch engraving efficiency to new heights.
With the LaserPecker 3, you can position the fixtures using four screws, allowing for continuous batch work. Simply insert your objects, such as cards, into the fixed shape and let the LaserPecker 3 work its magic. Say goodbye to repetitive parameter settings for each individual engraving. The LaserPecker 3 streamlines the process and effortlessly handles batch engraving, making it an ideal choice for business applications or large-scale projects.
Final Message
At LaserPecker, we take great pride in continuously developing and enhancing laser engraving innovations. Time is of the essence when running a business or pursuing a side hustle, and our models offer the perfect creative solutions. Whether you're selling customized products or original works of art, both online and in person, the engraver's unparalleled precision, speed, and efficiency, combined with the creative add-ons, will propel your productivity and sales to new heights. So, let your creativity soar with LaserPecker!
