htpowlasers's blog
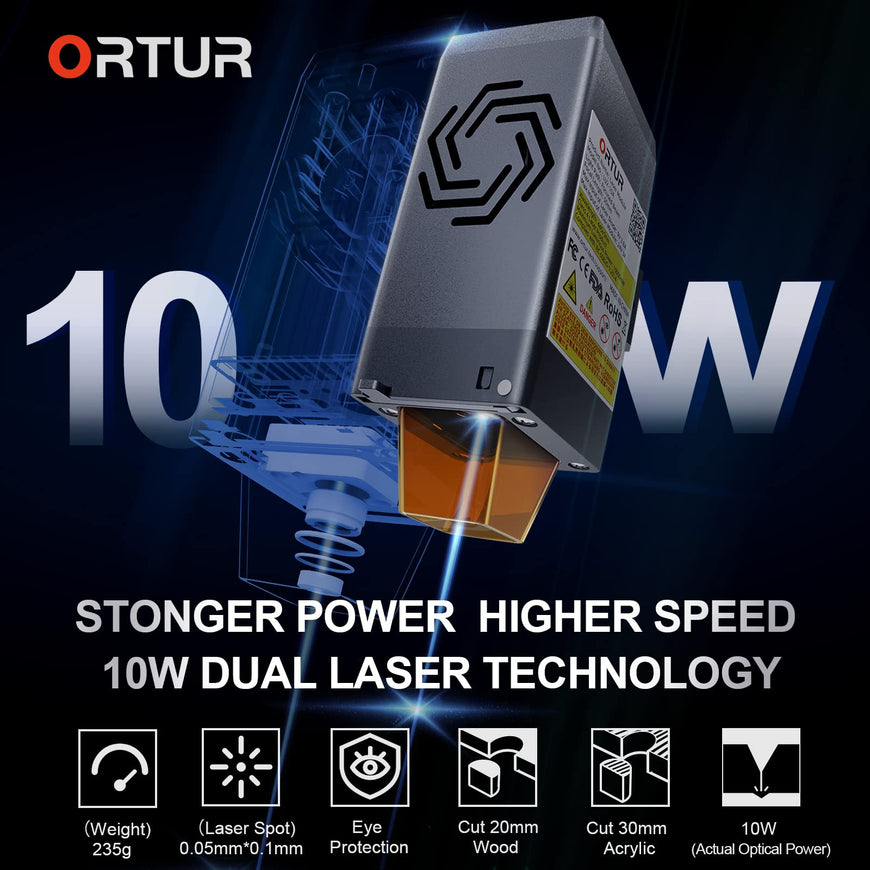
The Ortur Laser Master 3 laser cutter and engraver features a 10W diode laser that can engrave at speeds up to 20,000mm/min and cut wood up to 19mm thick. It has built-in WiFi and a powerful smartphone app to create and wirelessly send custom projects directly to the engraver.
I'll go over all of its features and thoroughly test Orturs' claims to see if this is the right laser engraver for you. If you haven't learned about this technology, please take a look at my previous article introducing this technology to help you quickly understand.
My box arrived a bit worn out but everything inside was well protected. Basic assembly is required, but should take no more than 30 minutes to assemble. I don't recommend using the supplied user manual - the illustrations are too small - go to the Ortur website and find a link to a YouTube video of the assembly, or check out the manual online so you can at least zoom in to take a closer look at the more tedious steps.
You can see everything that comes in the box, which includes some safety specs and a handy little storage box with tools and parts. There are also some wood, acrylic and metal samples to test the engraver.
The easiest way is to start assembly from the top down. Thread the Y-axis motor cable through the left Y-axis, then connect the left and right Y-axis with one bolt. The frame of the router is not a standard aluminum extrusion - Ortur makes custom parts that are well machined and lock precisely into place, ensuring the frame is square.
Once the Y axis is in place, you can slide over the already assembled X axis. Then mount the straps on both sides, which you need to blindly hook onto the pulleys inside the back assembly. It's a bit of a hassle, but if you're really stuck, you can remove the end cap so you can see what you're doing.
Then you need to attach the idler. Fit them loosely and loop the straps around them. Set its position with the included set screw to set the belt tension. There is a marker showing their best position. You can then screw the pulleys into place. If the strap is too loose or too tight, you can loosen these bolts and adjust the set screws.
You can then use the single bolt again on both sides to attach the front assembly. Connect the motherboard connector on the connector and connect the Y-axis cable that was pulled earlier. This was the most troublesome bit for me - it was very difficult to plug in the little connector.
You can then connect the other end of the connector to the X-axis motor and use the provided zip ties to loosely hold this rather bulky cable in place. Then connect the laser's cable to the socket marked "L" and secure loosely in place with a zip tie.
The laser module is already equipped with an air-assisted nozzle and a laser shield. It slides onto the X-axis using a dovetail mechanism and can be locked into its vertical position with a thumbscrew.
Plug the laser cable into the laser module using the keyed 5-pin connector. It's all very neat, making the laser module very easy to remove to clean the lens, remove the air assist nozzle, or replace another laser module in the future.
You can then install two stop bolts to the front of the engraver to prevent the laser head from hitting the front assembly. Slide the X axis onto these stop bolts, then slide the belts on both sides into the toothed belt grooves so everything is square. Screw on the WiFi antenna to complete the assembly.
This is the smartest engraver I've ever seen, and it's well made and solid.
My only two real criticisms are the rotary scroll wheel switch, which, while useful, is rather exposed and looks a bit cheap. What's more, the bulky wiring machine lacks any cable management.
It's easy to get caught in things, so I 3D printed a small zip tie base and taped it to the side of the router with double sided tape, which helps keep things organized.
It's a very low-profile machine, for reasons I'll get to later, but you'll still need quite a bit of room. Above you can see the required working space for the machine. The dimensions listed on the Ortur website seem to be a bit off. But if you want to move it around, it's pretty light at 4.3kg.
The top of the front assembly has a power button that requires a long press to turn on and off, and a multi-color LED ring that glows to indicate its status. Then there is a barrel lock with key provided and emergency stop button. Keyed locks are a welcome feature if you have young children around or want to use them at a school or makerspace. You will need to make sure the lock is in the open position and reset the position by turning the emergency stop button clockwise to open the machine.
Behind the front assembly is a microSD card slot in a rather awkward position, with a reset and boot switch next to it.
On the left side of the front assembly are the USB port for connecting to a computer, the DC jack for connecting an AC adapter, and the WiFi antenna.
The Y-axis switch on the back needs to be in the Y-motor position, unless you're using the rotary wheel that connects to the port below the switch.
The OLM3 features a 10W laser module combined with two 5.5W laser diodes. It has a 0.05 x 0.1mm focal spot and an 8mm depth of field, providing a good combination of engraving and cutting performance. Its 400mm x 400mm capacity is average for an open diode laser machine of this type, but smaller than the TwoTrees TS2 I saw last month.
Its biggest selling point is speed. Ortur cites an engraving speed of 20,000 mm/min, twice the engraving speed of a typical 10W laser. It achieves this through its low profile design and relatively compact and light laser module. But this low-profile design does mean that you'll need to lift the router to machine thicker items, especially if you're using a honeycomb cutting table. Ortur does sell foldable feet to increase its height, but I haven't received any to try.
Before I go on to discuss testing, if you're new to all this, be sure to see my previous article covering laser safety. The article also covers the basics of laser engraving and cutting, and the basics of using software like Lightburn which I will be using with OLM3. At least from a safety standpoint, you must wear the included laser safety glasses.
The Ortur does have some extra security features along with the key lock and panic button I mentioned earlier. It has tilt protection, which turns off the laser if the machine falls off the table, and it has exposure duration detection in case the motor stops moving for any reason. If the laser is left on at the same location, it may cause a fire.
Before you can turn on the laser engraver, you will need to install a microSD card - the engraver will not work without it. Be careful not to miss the microSD slot and slide it into the front assembly frame. I then connected the Ortur to my computer with the provided USB cable. You will be able to view the contents of the microSD card through this USB connection.
Unusually, this is a USB-A to USB-A cable, rather than a typical printer cable that has a square USB-B connector on the other end. In Lightburn you can also use the free LaserGRBL, add the engraver manually and select the GRBL with USB connection and set the size to 400mm x 400mm. The home position is on the front left, and you can disable auto-homing, as it will do it anyway. The laser has a focal length of 50mm and the laser module has a convenient spread out arm to set the correct height above the workpiece.
I found the extension arm to be a little flimsy, and it didn't lock into place. The adjustment changes slightly as you tighten the thumbscrew, so it takes some practice to get this right. I prefer the motorized automatic height adjustment feature on the Two Trees TS2, which also lets you automatically lower the Z height when making multiple cuts.
I wanted to test the high-speed claim first, so I engraved a grayscale photo of this cork coaster. I'm using 20,000mm/min, 0.1mm line spacing, 100% power, it's too dark as you can see. In Lightburn you can adjust the speed and power during printing, I ended up with 50% power for the last third of the engraving and it looks about the same. Printing takes approximately 8 minutes.
Ortur provides helpful guidelines for engraving and cutting various materials on the included microSD card. This is a good starting point, but I recommend using the material testing functionality in Lightburn to fine-tune your setup for best results.
For Basswood plywood, Ortur recommends 15,000 mm/min at 100% power. Using the Lightburn material test, I engraved this test image, which I would say is about correct, but I darkened it a bit and engraved the same image again at 12,500 mm/s.
I also tried engraving these coated aluminum business cards and after a little rubbing with isopropyl alcohol it worked really well. I again used Ortur's recommended settings: 3000 mm/min at 25% power. Although these coatings do give off some nasty smoke, even when extracted.
The 10W laser is even powerful enough to engrave stainless steel. You don't need to apply any coatings, and the little name tag performed really well at Ortur's recommended 2000mm/min and 100% power - even though my text did get a bit off center.
I cut and engraved a small tag out of leather less than 2mm thick and it came out perfectly - even the small holes were precise and rounded, which is a challenge for these belt driven machines.
When cutting, you can use the built-in air-assisted nozzle, but you'll need to provide your own pump. I tried it with a cheap pump from Fox Alien, but it was actually worse than no pump at all, as you can see below.
With the fan turned on along with the laser, the laser module itself seems to generate enough air for lighter cuts.
For deeper cuts, I used the main compressor with its digital regulator set to 15 PSI, which did give sharper results.
Ortur does offer some additional fittings to work with the air supply hose, but I just used a 3D printed adapter to connect it directly to my compressor hose. The hose fits directly into the laser module. It's a bit of a hassle, but you need to push down on this black collar to retract the little barb that grabs the hose to insert and release the hose. I attached it loosely to the router to keep it tidy and keep it from getting tangled.
The air nozzle can be easily removed when engraving. Just squeeze the laser shield lightly and unscrew the nozzle. This is a very clever design.
Like all of these diode laser makers, Ortur has some bold claims to make when it comes to cutting. According to their website, this 10W module has a maximum cutting depth of 30mm. Although looking more closely at their materials chart, this is using black acrylic, 17 passes at 100mm/min and 100% power, so you don't want to do this too often, even if possible.
But the more typical, stronger birch plywood was more of a challenge. With the air assist from the compressor I can cut 100% at 200mm/min most of the time. But the 10W TwoTrees TS2 can cut the same sheet at 300mm/min.
Jog the laser into position using the app with WiFi
The OLM3 also has built-in WiFi, and you can easily connect to the machine using the free Laser Explorer app. The app does far more than I expected. You can select an image or text to engrave, create barcodes and QR codes, but what I find most useful is using it to precisely nudge the position of the laser. The machine doesn't have a built-in LCD screen to control the engraver, but the app is a useful substitute. I would be a little wary of using it for sculpting, though. When I turn on the laser to line up jobs, it sets the power at 4%, which is way too high and starts burning a spot on the material if you're not careful. I can't get it lower than 1% - in Lightburn I use 0.25%, which is enough to see the laser dot.
Connect Wirelessly to Your Engraver Using Lightburn
I still prefer to use Lightburn to send jobs, and I did find the app disconnect a few times while testing. You can also access Engraver's own server via the IP address visible in the app. I was able to connect to Lightburn's engraver from a computer connected via ethernet. I just added another device and selected ethernet. Using this machine wirelessly is convenient, but I haven't had 100% success with it, with a few prints randomly aborting during printing.
The laser engraver is completely silent when not engraving. The fan is only turned off when the laser is on, when the laser is off the fan turns itself off after a few seconds. The fan is loud when running, but the motor runs very quietly. You can hear it in action in the accompanying video. The overall feeling is that of a very refined carver.
The Ortur Laser Master 3 is a very well designed machine that delivers some really good results. Its engraving performance is particularly impressive, with its high speed and fine laser spot. Setup is super easy, and I especially like how the belt and pulleys hide dirt and grime.
The integrated WiFi is a great feature, not only for use with the smartphone app, but also for wireless printing from the Lightburn, even if I didn't get 100% reliable results in my testing.
While I've never laser-burned before, I'm familiar with vector graphics, photo editing, and similar hardware used by 3D printers. Even with my previous knowledge of the hobby, laser engraving and cutting is indeed a new hobby for me. So we can learn about Ray5, software and technology together.
Specifications and Features of the Longer Ray5 Laser Engraving Machine
High-tech laser module
The laser engraver features the latest in state-of-the-art FAC laser technology with the option of a compressed laser spot. In terms of the size of the laser, it is 0.08 x 0.08 mm. That means it's a hyperfocused laser spot. Also, more focus on the laser spot means more power. This directly translates to finer cuts and higher quality designs. The high focus and high energy of the laser spot make the engraving firmer. In terms of power output, the module output can reach up to 5-5.5W.

32-bit chipset
The Longer Ray5 laser engraver features an ESP32 chipset running at 240 MHz. This means the chipset is much faster than other contemporary machines. Especially for 8-bit chipsets, the operation speed will be very different. Another key feature of this chipset is that it has Wi-Fi connectivity. This means you can easily control the design using the internet.
Protection and Safety
This laser engraver has some special safety and protection options. This means that if the machine starts up during operation, the machine shuts itself down. Also, if there is flame or heat inside the engraving machine, the machine will shut itself off. These features of the engraving machine make it very safe to operate.
Another type of protection that laser engravers offer is eye protection. The acrylic cover of the laser module acts as a shield for the eyes from laser damage. Despite protection, it is recommended that you wear safety goggles when using your Longer laser engraver.
Compatible with Windows/MAC/Linux system
The Longer Ray 5 laser engraver is compatible with all modern operating systems. The built-in operating system of the free engraving software is LaserGRBL. However, if you need more features, there is also a paid version in the form of LightBurn software. In terms of file types, the engraver supports all major types of design files. This includes BMP, jpg, png, SVG, DXF, etc.
Ray5 upgrade options
The longer Ray 5 laser engraver comes with the option to upgrade its laser engraver. An upgradeable feature is that the power supply and motherboard support more powerful 8W/10W laser modules.
Touch screen
The laser engraving machine offers a 3.5-inch touch screen that makes interacting with the engraver easier. This feature also enables users to work on designs without connecting them to a computer for control.
Offline control
In addition, Ray5 engravers can use TF / microSD card to load designs easily. This means you can upload files to the engraver even if you are not connected to the internet.
With Wi-Fi control and a touchscreen, the Longer RAY5 is pretty much the best laser engraver out there. As a result, CNC lasers are particularly easy to operate. Just 5 watts of light power is enough to produce good results on many materials.
Other brand products: LaserPecker 3 deluxe , sculpfun s30 pro max , ortur laser master 3 , twotrees ts2 10w , atomstack a10 pro
The Sculpfun S30 Pro is a 10W diode laser engraving machine with air assist, perfect for anyone looking to get into the hobby.
The Sculpfun S30 Pro Laser Engraver is very similar to many other machines of this type on the market. I mean, once I started going online to learn how to operate it with the software I needed, I was amazed at all the options. Since this is the only laser engraver of this type that I've used, I won't compare it to anything else. I can't even compare it to other laser engravers I've tested because they're completely different types of lasers, but that's a story for another day.
First, let's talk about the construction of the Sculpfun S30 Pro. Once assembled, it is very sturdy! The joints where the X and Y frame members meet are tight. The frame pieces are made of aluminum alloy, which is lightweight and strong. I don't know if they are machined or extruded, but each one is well made, straight and has clean channels. I don't think anyone will fault the build of the S30 Pro.
Next up is a 10W diode laser. From my very limited experience, what I can tell you is that there seem to be 3 types of lasers available to hobbyists: CO2, Fiber Optic, and Diode. Diode lasers seem to be the least expensive of the 3 lasers, making them an excellent choice for hobbyists and experienced users alike. The things to know when choosing one should be based on the type of material you will be cutting or engraving. Each has its advantages and disadvantages. I've had more fun with the Sculpfun S30 Pro diode laser so far, so it's definitely a pro in my book. It's strong enough for me at the moment.
Another great thing about the Sculpfun S30 Pro is that it comes with automatic air assist and the required nozzles are already installed on the laser head. All you have to do is connect the air pump and air hose. Air assist isn't necessarily necessary, although some might argue against that statement. The reason this is a great feature is that it keeps charring to a minimum when cutting materials like wood, resulting in a cleaner end product with less sanding.
The brains of the S30 Pro are in the box at the bottom right corner of the unit. It has the latest 32-bit motherboard with support for air assist and bluetooth. I say should because I haven't tested this feature yet. To use it, you must purchase a compatible antenna. I've read online that other people have done this on other similar engravers with mixed results, I didn't do anything with it because the feature was more worth having.
When setting up your Sculpfun S30 Pro, please take the time to get it right. You'll thank yourself later. It took me about 45 minutes to an hour to build it. The instructions are easy to follow, so be sure to read them.
Each piece and bag of parts is labeled so you know what to use when.
They label the cables so you know where to connect them.
Everything you need to get the job done is included, such as tools and hardware.
Even the velcro and zip ties for organizing the wiring are here.
When assembling the frame, be sure to let the corners loose until everything else is assembled. Once you're done, you can go around and make sure each corner is square and flush. The most difficult part of the construction was the belts running the gantry. The belt has to pass through the channel in the frame and then run the gantry wheel up, over and down. That doesn't mean it's hard to do it. I just have big hands and that part can be a little clumsy.
Nothing wrong there, just the nature of the beast. The last thing to do is connect it to your PC via the included USB cable. I don't like the USB-B connection. It's made on top of the control box, and the weight of the cable pulls on it a bit.
The next thing you need to set up your S30 Pro laser engraver is software. So you know, it doesn't come with anything. I find that odd too, but my impression is that most laser engravers don't have their own software. From my experience with my first laser engraver, I can see why. While these companies can make great hardware, that doesn't always mean they make great software. Like many other products, the S30 Pro is designed to be compatible with third-party software, and the focus of third-party software has been strictly on production software. I know there are two programs available, one is free and the other is free to try and then $60. I tried both and ended up choosing the paid version. Another great thing about this software is that there are many communities, websites and Youtube videos teaching you how to use them. Believe me, there is a lot to learn. From speed and power settings for different materials, to designing your project in the software, to using all the settings to ensure you get the most out of your engraver.
I am very impressed with the Sculpfun S30 Pro laser machine. Yes, there is a learning curve due to the software and all the different setups, but as I said, there is a lot of support to help you dial in. Most people recommend that you do a material test based on your material. I'm trying to sculpt or cut, but I've chosen a different strategy that involves finding a library to import. All of these settings are ready to go, although I do need to tweak a few .
With the S30 Pro, I can engrave metal, wood and leather. I haven't gotten around to cutting anything yet, and my wife keeps coming up with other projects for me to do for her, although I have no doubts that it will turn out great.
Now to the security issue. Wear the included goggles when using the S30 Pro, and boy, you don't want to shoot yourself in the eye! Also, make sure you know which materials are safe to use. Some emit toxic fumes when burned. Finally, make sure you're in a well-ventilated area and/or have a smoke extractor. I thought I could pull the smoke out of my home office windows with a powerful fan. Let's just say it didn't turn out as well as it should. Totally my fault and nothing to do with the Sculpfun S30 Pro.
I found a new hobby with the Sculpfun S30 Pro. I love this stuff, it's fun to make for friends, family, and myself. So if you want to pursue a laser engraver as a hobby, or even start a side business, check out Sculpfun. They work great on the S30 Pro!
The Sculpfun S9 is a high-end machine that outperforms its predecessors, the Sculpfun S6 and Sculpfun S6 Pro, as well as competitors like the Atomstack A5 Pro.
Like the Sculpfun S6 Pro, the S9 Laser Engraver comes with a manual of good, easy to understand assembly instructions. The mechanical part is almost the same as the S6 series. All necessary tools are included. Screws and parts are packed in separate bags and labeled accordingly according to the necessary steps in the assembly manual. The machine can be assembled in less than 30 minutes.
The Sculpfun S9 Laser Engraver features a laser diode that puts out about 5.5W of optical power - just like the S6 Pro. But the laser head itself is much larger, and has some clever optics inside that allow the beam to be focused for a greater distance and have a higher optical density, allowing you to cut thicker materials with more efficient power. The advertised maximum cutting depth is 15mm. We will test this. The Sculpfun S9 is advertised as 90W CO2 laser equivalent power. A laser diode is a fixed focus diode, which is pretty awesome.

The focusing process is the same as the sculptfun S6 Pro and S6 30W we tested earlier. For best cutting results, the cutting head needs to be 20 mm above the engraving surface. This is achieved by focusing on the aluminum blocks. The head is then focused with the reticle positioned approximately 3 mm above the surface. But the good thing is that you can easily remove the shade if needed. This will come in handy when carving odd objects like spoons, axes, and other irregularly shaped objects. The laser head is tightened by a thumb screw, making the focusing process quick and easy.
For cutting thicker materials, it is recommended to remove the acrylic protective cover and focus the laser head a few millimeters lower than the standard. In this way, the cutting performance will be much better.
Cutting and engraving different materials
Engraving: wood, leather, cotton (clothes), rubber, paper, fruit, foam, acrylic, black anodized aluminum, black metal, stainless steel...
The Sculpfun S9 is a powerful knife.
Cutting: wood, paper, tape, fabric, acrylic, cardboard, fabric, bamboo, plastic board, KT board...
With this machine, you can cut paper, tape, and thinner cardboard in one pass, and cut wood multiple times. The machine can cut acrylic and wood, especially poplar plywood, which is soft and is the wood of choice for all laser cutters.
We have tested the machine with engraving and cutting different materials. You will find our test results in the following chapters.
Software and Supported Formats
You can use the Sculpfun laser engraver with the free LaserGRBL software, which works fine but is a bit clumsy to use. It's great for some tests, but I chose Lightburn, which is more powerful and intuitive to use. While it's not free, the license costs $60. However, the software offers a 1-month fully functional free trial, which will help you decide if it's worth it. For me, it's definitely worth it because it saves a lot of time (it's not free).
With LaserGRBL you can import vector files (NC, BMP, JPG, PNG, DXF...) and bitmap image files (bmp, jpg, png and gif),
Lightburn supports even more formats: AI, SVG, DXF, PDF, HPGL, PLT, and RD for vector formats, PNG, JPEG, BMP, TIFF, TGA, and GIF for image formats.
The vector format is the preferred format for these machines because it contains the path around the edge of the shape that the laser head traces. Engraving vector files is faster because the laser cuts directly on the path instead of scanning and dotting the bitmap image (photo) as a printer does.
You can get millions of free vector designs on the Internet, or you can use a free vector drawing program like Inkscape or QCAD (for more technical drawings)
You can also import tons of vector designs and images from free vector sites, or you can buy beautiful laser designs on sites like Etsy. This really expands your capabilities.
wood carving
Our standard engraving patterns are designed to demonstrate the engraving capabilities at different settings, so you can see the effect of the laser beam.
What's immediately apparent is that the Sculpfun S9's engravings are sharper and more contrasty than other machines we've tested before. Also, the wood surface is basically free of smoke stains. That's very impressive!
The power scale test pattern shows how the machine carves at different power levels at different speeds.
Power is varied from 10% to 100% in 10% increments at speeds of 600, 1200, 1800 and 2400 mm/min. We omitted doing the low speed/high power shape with the Atomstack A5 20W because the beam burns too much at low speed. This left a large charred blob that provided no useful information.
At first glance, the Sculpfun S9 has significantly higher power output than the Sculpfun S6 Pro. We'll see if this is true in a later test.
The interval scale test here is used to show whether the laser focus shape is square or rectangular. The scanning interval gradually increases from 0.1mm to 0.5mm.
In this test, the Sculpfun S9 showed that the shape of the beam was very close to rectangular, as the vertical and horizontal sculpting was well balanced.
We will be able to estimate the exact spot shape later when we test the engraving on the anodized aluminum.
This is a test of engraving a small photo of 20mm size while varying the maximum laser power.
Engraving photos is very slow because the laser head has to scan line by line like an inkjet printer. If you want to engrave a very large photo, be prepared to wait for hours :)
As we'll see below, the Sculpfun S9 is by far the best engraver for engraving photos. Photos look very sharp, with high detail and contrast.
Introduce
The Longer Ray5 10W Laser Engraver is powerful yet easy to operate, producing outstanding laser engraving results. Despite the many benefits, consumers may still experience issues that need to be addressed.
In this article, I will walk you through some typical problems of the Longer Ray5 10W laser engraver and provide solutions.
Problem 1: The cutting or engraving of the laser engraving machine is not normal
It's not uncommon for a laser engraver to have problems cutting or etching material properly. If you encounter this problem, there are several ways to check.
First, this problem is often caused by inattention. To ensure that the laser beam is sufficiently focused on the material, the laser head must be properly aligned and the focus set to 50mm. Incorrect positioning of the laser head can cause it to miss material, resulting in uneven cut or engraved designs.
Second, make sure the power output and speed parameters are acceptable for the material being engraved. If the power output of the laser is insufficient, the material may not be cut or etched properly. If the power output is too high, the material may be burned or damaged. Likewise, if the engraving speed is too slow, the material may overheat, causing the edges to melt or deform.
Last but not least, it is critical to ensure that the material is free of debris that could hinder the performance of the laser. The surface of the material may contain dust, grit, or other particles that scatter the laser beam, making precision engraving or cutting difficult. To prevent this problem, it is recommended to properly clean the material before engraving.
Problem 2: The engraving quality of the laser engraving machine is poor
When using a Longer Ray5 20W laser engraver, the machine may not be able to cut or engrave the material properly. If you encounter this problem, there are several things to look at.
For starters, lack of concentration is a common cause of this problem. To ensure that the laser beam is sufficiently focused on the material, the laser head must be properly positioned and set to a focal length of 50mm. If the laser head is not positioned properly, material may be missed, resulting in incomplete cuts or engravings.
The second critical step is to ensure that the power output and speed parameters are appropriate for the material being etched. If the power output is too low, the laser may not be able to effectively cut or engrave the material. On the other hand, if the power output is too high, the material may burn or be damaged. If the etch rate is too slow, the material may overheat and deform or melt.
Finally, make sure the material is clean and free of debris that could interfere with laser performance. Dust, dirt, or other particles on the surface of the material can scatter the laser beam, making precise cutting or engraving difficult. To avoid this problem, clean the material properly before engraving.
Problem 3: The laser engraving machine overheats
A typical problem that can shorten the life and performance of a laser engraver is overheating. An overheating laser engraving machine can cause various problems, such as damage to the equipment, poor engraving quality, and even safety hazards such as fire or smoke.
To avoid overheating, make sure the engraver is in a well-ventilated and well-ventilated area. This will help dissipate the heat generated by the laser engraver and prevent heat from building up in the machine's internal components. Airflow can be improved by placing the router in a well-ventilated area or installing a fan to circulate air around the machine.
In addition to providing adequate ventilation, make sure the router's thermal protection is turned on. This feature is designed to keep an eye on the temperature of the machine and prevent overheating by automatically turning off the laser if the temperature rises above a predetermined level.
Check the temperature gauge regularly to monitor the temperature of the engraving machine. If the temperature rises above the recommended level, turn off the engraver and wait for it to cool before restarting. This will prevent the system from overheating and causing damage to internal components.
Question 4: The laser engraving machine is not connected to the computer or software
For machine control and engraving design input, the laser engraver must be connected to a computer or software. If your laser engraver cannot connect to your computer or software, it can be frustrating and prevent you from using the machine properly.
A defective or improperly connected USB cable is one of the most common causes of connection problems. Check the USB cable and make sure it is securely connected to the engraver and computer to resolve this issue. To see if the problem is resolved, connect the cable to a different USB port on the computer.
Incorrect driver installation is another potential cause of connection problems. Laser engravers often require specific drivers to be installed on the computer before they can be used properly. Make sure you have the right driver for your engraving machine by checking the manufacturer's website, then follow their installation instructions to install it.
Finally, make sure the software you are using is compatible with your laser engraver and is properly configured. Some Longer engravers have their own software, while others use third-party software such as LaserGRBL or LightBurn. Check that the software you are using is compatible with your laser engraving machine and that the settings in the software are correct.
Problem 5: Laser Engraver Produces Excessive Smoke
Excessive fumes or fumes from laser engraving machines can be harmful to your health, so it is critical to deal with this problem promptly. There are a number of things you can do to reduce the amount of fume your router emits.
First, make sure the laser engraver is placed in a well-ventilated space. This way, the smoke is dispersed and does not accumulate in the air. Good ventilation can be created by placing the engraving machine near an open window or by using a fan to move air around the machine.
To help disperse smoke and odors, consider using a honeycomb work table or an air assist kit. Honeycomb table improves airflow and reduces fumes during engraving. Air assist kits can help disperse smoke by directing airflow over the material being carved.
In the end, it is important to use materials suitable for laser engraving and to avoid engraving materials that produce toxic fumes. Some materials, such as PVC or vinyl, produce toxic fumes when engraving and should be avoided. Instead, choose materials like wood, leather, or acrylic, which produce less fume when carving.
in conclusion
The Longer Ray5 10W Laser Engraver is powerful and adaptable for detailed engraving on a variety of surfaces. But like any machine, it may have issues that need fixing. By using the advice and fixes provided in this article, you can ensure your laser engraver will continue to work well and efficiently for many years to come.
Other Brand: Laserpecker , Sculpfun , Ortur , Twotrees , Atomstack
Buying a leather engraving machine is not an easy task. That's mostly because there are so many options available, and it's easy to get lost in the technical aspects of these machines.
If you can't find the right engraving machine or tools, I have some suggestions. Drawing insights from my years of leather engraving experience, I can suggest some options to help you personalize your leather at home.
Some people believe that engraving or needling can damage the leather. While this technique is vital, no damage can be done by engraving on leather. That's because you worked on the surface and removed minute amounts of material to design.
When you slide the tool across the leather surface, it forges the leather surface and leaves a design behind.
Can I laser engrave leather?
Yes, you can laser engrave leather with a laser engraver.
These machines use high-energy laser beams to create precise and detailed patterns on the surface of the leather. The laser beam acts as a chisel for engraving the design. The top layer burns when it hits the surface, turning into smoke. The result is a dark cut that looks elegant and authentic.
The best types of leather for engraving are full grain leather and top grain leather. While you can also use it for suede and faux leather, it won't have the same quality.
Just like there are different types of leather, there are different types of lasers. CO2 laser machines are best for engraving leather. But they are not cost-effective and can only be used for industrial purposes. For DIY projects, you should consider UV lasers and diode lasers.
Loved by professionals and beginners alike, the A5 is the perfect laser engraver for both functionality and safety.
The newest addition to this laser engraver is a new eye protection design hood. It filters out 97% of UV rays. You can look directly at the laser while operating it without goggles.
The machine provides a laser between 5-5.5W, enough to engrave any thickness of leather. You can adjust it to suit thickness and type. The engraving accuracy is about 0.01 mm, which can be called highly accurate. In addition to accuracy, the contrast ratio also stands out due to its high power.
A5 is compatible with two leading engraving software LaserGRBL and LightBurn. Connect the machine to your PC or laptop, load the design onto the software, and engrave it on the leather. It's that simple.
The brand Atomstack is involved in the research and development of laser equipment. So when you buy an atomstack a5 pro , you're getting the latest in laser technology.
Easy to assemble and use, you'll love this laser engraver.
This entry-level laser engraver is designed for beginners and hobbyists.
The main problem for beginners is assembling the machine. But this laser engraver comes pretty much pre-assembled. All you have to do is connect to your computer and start carving leather.
It also has wide software compatibility, which means less research is required to find the right software. It is compatible with all three leading operating systems (Windows, Mac and Linux) as well as LaserGRBL.
To ensure your safety while working, this machine has four protection systems. One is active position protection, which stops operation if the position deviates. This is followed by a laser beam safety guard that intervenes if the signal transmission fails.
The third and fourth are exposure duration detection and power control systems.
The results produced by this machine are impressive. It has a focal spot of 0.07 X 0.06 mm, which is ideal for engraving high-precision designs on leather. But you can use it for other materials like cardboard, stainless steel and stone.
Weighing less than 7 pounds, this leather router is very portable. You can easily bring it to a friend's house or art club.
The L1 is a high-end high-power laser engraving machine from LaserPecker, a well-known brand in this field. It comes with many accessories and everything is packed in a carrying case, making it easier for you to carry the machine.
The machine has a unique design with a tripod and motorized stand. Once you're set up -- which shouldn't take long -- you need to connect to the mobile app and start engraving on the leather. You can engrave any picture on your phone. The results are very accurate, with a high level of detail.
It has blue filter protective goggles to protect your eyes from harmful radiation. Additional security features include motion detection shutdown, thermal shutdown, and password lock.
Longer Ray5 laser engraving machine has built-in 3.5 inch touch screen, TF card slot and built-in WiFi. Plus, it has a built-in controller that eliminates the need for a computer to be constantly connected to the laser engraver. Ray5 can be used for engraving or cutting.
Touch Screen and Offline Engraving: The Longer RAY5 10W laser engraving machine has a built-in 3.5-inch touch screen and a friendly user interface. This allows us to cut multiple pieces of plywood or an image to be engraved without taking up your computer to run it. Longer Ray5 has a built-in controller, no need to connect the laser engraving machine with a computer all the time. Save your files to TF card and use it to run Ray5 for engraving or cutting.
Ultra-Fine Laser Spot and Powerful Laser Module: This laser engraving machine adopts the latest FAC laser technology for compressing the laser spot, the spot size is 0.08*0.08mm; the smaller the spot size, the more concentrated the energy. This makes engraving or cutting much stronger. The output power of the laser module reaches 5-5.5W.

32-bit chipset and WIFI connection: RAY5 is built with ESP32 chipset, including WIFI connection for engraving machine and router. This 32-bit chipset runs at 240MHz. This means it is faster and more powerful than comparable machines with 8-bit chipsets. As a bonus, RAY5 supports WIFI connection via web page or App to control engraving or cutting.
Safety Protection: Longer RAY5 is designed with movement protection and thermal protection. If the machine moves during use, the mobile protection will initiate an automatic shutdown to ensure personal safety. Thermal protection initiates an automatic shutdown if a flame is detected or if the engraving area is overheated.
Compatible with Windows/MAC/Linux systems: Longer RAY5 5W is compatible with free engraving software LaserGRBL and paid LightBurn software. Supports importing BMP, JPG, PNG, DXF, AI, SVG and other file formats.
Power Button & Eye Protection: The engraving machine has a power switch for turning the power on or off. The laser module has an acrylic cover. This shields the laser to help protect the eyes. You will also need to wear goggles for laser light scattering.
The Longer Ray5 laser engraver is made from a material that feels like aluminum. It's lightweight but strong. Assembly is required, but is easy. There is a shield over the laser and it contains shadows. Also includes a USB micro SD card and adapter. USB cable and Allen key to tighten the screws.
The first step is to assemble the router. It's easy as long as you take your time. The instructions in the manual aren't great, but there are also instructional videos on the included micro SD card. However, I don't need video.
Once the engraver was assembled, I used the micro SD card that came with the USB adapter to test the unit. The card comes with 3 sample files for engraving. Additional software is also on the memory card, including manuals, firmware, instructional assembly videos, and 2 design applications.
Once the height is set, it's time to insert the micro SD card and start engraving. A USB cable is included if you want to use an external hard drive or connect directly to your PC.
Watching the Longer Ray5 20W laser engraver is as much a pleasure as I am watching a 3D printer print. However, this device produces quite a bit of smoke and of course the smell of the material you are carving. If you want to see the laser to see what it's doing, you'll have to use the shade that comes with it. I recommend using it outdoors or at least in the workshop. Also, I didn't test the cutting ability as I currently don't have a suitable surface to place underneath the material I'm cutting. The device would be better if it included a case and some material to limit the depth of the laser. The way the engraver works is that you can choose how many times you want to engrave while engraving, and each time you engrave, it will cut deeper. I have to assume it would take hours to cut open the 1" think board I used for testing. Overall, this is still a very good engraver with a large print area and a wide range of uses.
I must say that I really like the quality of the Longer laser engraver, its relatively quiet operation, and the quality of the engravings it produces. Since it's not enclosed, in the future I'll have to use it outdoors, maybe in my garage. There will be quite a bit of smoke when carving, and if it is carved from material, there will also be a smell of burnt wood. I tested it indoors and the smoke was the offending part. However, the experience was great for me, and this carver is very capable, especially because of its larger build area. I give it a job well done!
