matthewtaylor39's blog
Important Highlights-

Canon has announced to bring its latest Colorado 1630 UVgel Roll-to-Roll Printer.
It is a time and cost-effective printer based on UVgel technology, ideal for businesses.
It produces high-quality prints of up to 1,800 dpi and is long-lasting with an instant drying capacity.
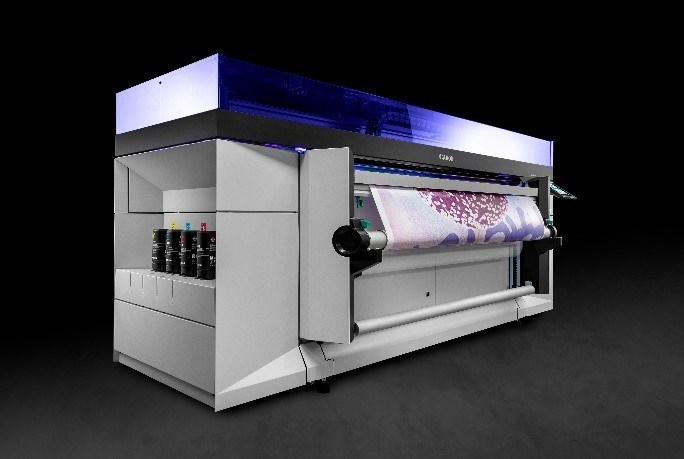
Canon has recently announced to launch its new Colorado 1630 UVgel Roll-to-Roll Printer. The configuration for Colorado 1630 UVgel’s base model can be made as per the business requirements by adding the features like FLXfinish, a second media roll, and easy double-sided printing. This Canon printer has been structured to be resilient, consistent, and stable, all at once.
The Colorado 1630 printer by Canon offers to deliver the finest quality print of 1,800 dpi, with long-lasting, free of odor, and instant drying capability, tackle the vast available applications. Also, this printer has been designed for sign makers, PSPs, and domestic printers. It can manage to reach the speed of 1,195 square feet per hour while printing outdoor banners and billboards. Working in its high-quality mode it can attain a speed of around 312 square feet per hour.
Read : mouse lagging
This Canon printer shares its features, output quality, and flexibility with Canon’s Colorado 1650 printer, which is comparatively faster than Colorado 1630. Canon’s Colorado 1650 printer Canon’s unique UVgel 460 inks can also be imported to Colorado 1630 printer to produce finely honed printouts with a wide array of colors. It provides effortless printing with the minimized cost of printing due to its excellent efficiency, with lesser wastage and 40 percent lesser consumption of ink, compared to other technologies. This is the best way to let the customers expand their outcomes and extend their business.
The Colorado 1630 has been brought to the existing UVgel roll-to-roll printers lineup and has certainly raised Canon’s printer market. On the other hand, the Colorado 1650 is also available for customers with higher volumes as well as those with the UVgel Wallpaper Factory.
Also read : mouse freezes windows 10
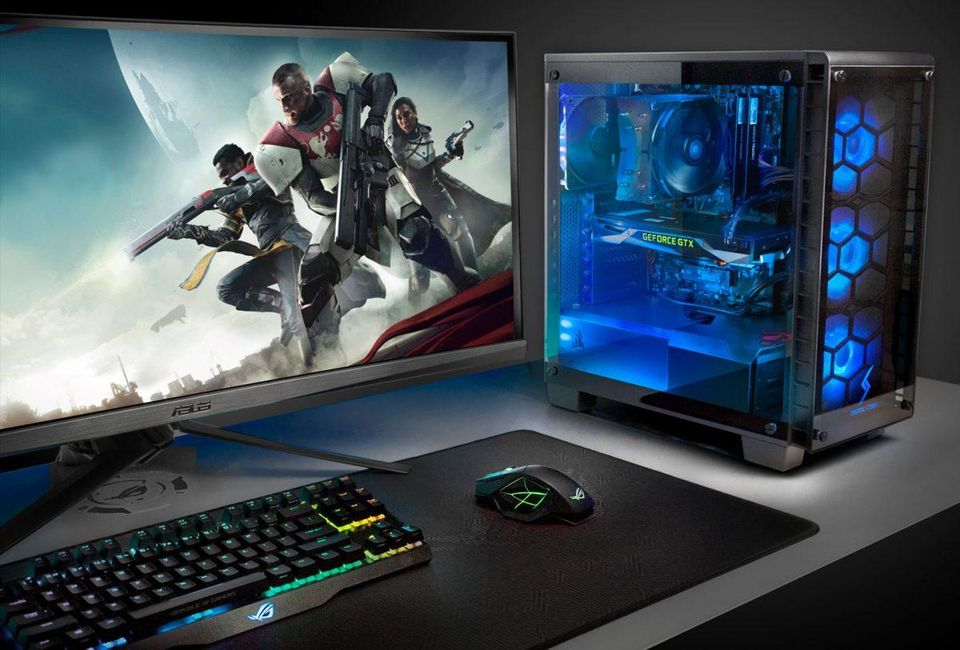
Is your gaming PC messing up your gaming experience with its slow processing? It’s high time you set your gaming PC for a treatment for this uncanny behavior. Similar to any other PC, you will need to check it both externally and internally and fix the issues wherever required.
The slow processing issue in your PC may have resulted from not one but the numerous factors including dusty hardware, loosened components, years old system as the external factors and stacked memory, unworthy software and games stored, malware and viruses, and more, as the internal factors. But there’s no reason to panic as all of these factors can be worked upon using simple tricks and techniques.
Discussed below are few ways to deal with the issues in your “gaming PC” holding you away from enjoying your “PC gaming.”
Also read : Driver Printer Canon
Cleaning your SSDThe documents stacked upWhatever profession is your surviving option, your Documents folders are sure shot crammed up with the documents no matter how useful or useless they are. These documents unnecessarily populate your drive space and should be considered to be arranged, removing the futile elements you don’t require any further. Also, Drive is the better option for them to be stored where they may lie undisturbed for years. Or you can use external devices such as a USB drive to store them.
TreeSize to administer the space on your device
Using TreeSize to scan your device space

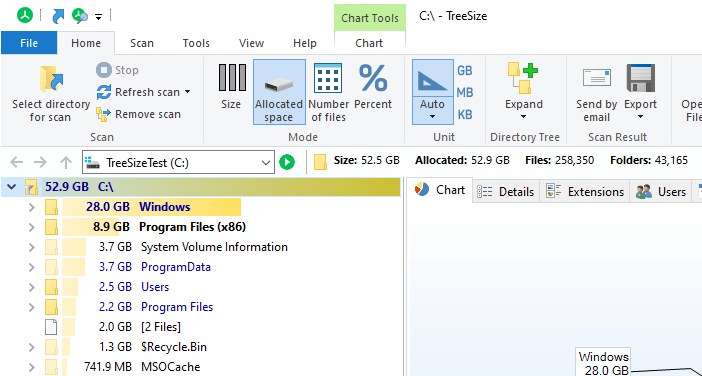
If your PC is running out of drive space, you can quickly scan and analyze what eats up most of the space on your device using TreeSize. It’s a handy tool available in its free as well as paid versions.
If you are a hardcore gamer, you may be using a SATA drive, NVMe SSD, or a hard drive. With these in use, you incessantly keep on installing more and more games so that you can play them whenever you feel like. To store these games, you need to make sure your device storage has enough space.
You certainly want to get a clear insight of the available space in your drives so as to then manage space for the forthcoming games. With TreeSizeopened, you will have the apparent picture of how much of the space has been occupied and how much more is left. All you need to do is right-click on your drives and click to open TreeSizeFreefrom the menu. You will eventually get to know what you are looking for.
Installed games
Steam storefront

You can also ensure getting rid of some of the games you may have installed for days, weeks, months, or even years and have been taking up ample space. How do you get to know about these games? Again, TreeSize is there for your assistance. Use it to get a glance at your folders containing Epic Games, Origin, Steam, Ubisoft games to know how hard your hard drive space has been consumed with the most impactful games available. Of course, some of these games may be the ones you play the most. But those lying intact can be uninstalled and reinstalled when you finally decide to actually play the games.
Images and videos
A game still

When you are a die-hard fan of PC games, you want to completely indulge in the game moments and end up accumulating a lot of images by either downloading or otherwise capturing screenshots. It’s just a matter of a moment, and then you even forget about those images and screenshots. So, it’s better to get over them as soon as possible and delete them for your betterment.
Game videos have a different fan base that keeps on watching out for the critical game moments. Not only this, but some of the enthusiasts like to download and keep the game trailers already available on YouTube. In any case, they are least required and should considerably be delete
Read more : cannon.com/ijsetup
![C:\Users\LENOVO\AppData\Local\Microsoft\Windows\Temporary Internet Files\Content.IE5\TVJL3J8H\43775361884_cccba2399e_b[1].jpg](https://lh5.googleusercontent.com/6Z0i4ApqgjHuHvyb2eb0ipPOMD3cJcrrnYqVSqnqaBo0Lt9pjxQA-Ch-J7iOOqkK0Qu5dZVGgBIHv5Nn5gpkJRQgJmT6EBo0SFp4Uo1cJfgeKxiLso1hbwPO5cDMQKD6oHcJOYLE3fjZ7BiD8Bebn_HM94yEG5N_9qpoMCsqh4ECiD1ul5BFsKRKvh4ueJ0P2-KvTjo)
True gamers cannot afford to let their PCs lag, especially when using the PCs as their game consoles. To make sure you play games without interruption, breakage, and pauses, you need to ascertain the PC optimization frequently. A well-optimized PC will not only enable you to enjoy your gaming experience but will also guarantee your PC health at par.
Manually cleaning a PC turns out really a time-consuming process. Instead, you can consider using the PC cleaner software that effortlessly will ensure your PC optimization in fewer minutes.
Read more : pc randomly restarts
Try Advanced PC Cleanup software that will completely clean your PC to uplift your PC’s health for optimal performance and an unstoppable gaming experience. The software will get your PC cleaned of junk files and other trash files, making your disc space capacious, meanwhile boosting its RAM and CPU efficiency. Additionally, you get rid of cache, cookies, and even proof of identity theft.
Moreover, it doesn’t exhaust and even lets you scan the malware, spyware, and other sorts of cyber threats on your Windows PC. Further, it adds up for speed in the startup times, deleting software as well as cleaning up the old existing downloaded files and applications.
How to use Advanced PC Cleanup App
Advanced PC Cleanup App Interface
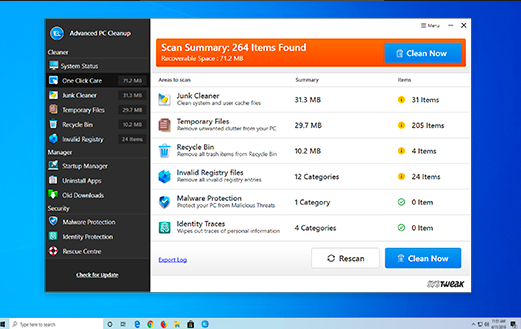
A process of a few simple steps, Advanced PC Cleanup, comes with an interactive and spontaneous interface. You can use the software by following the instructions given below:
Firstly download the Advanced PC Cleanup software on your PC. Then, Install the software and open it.
You need to first register the application in order to activate it.
Following the activation, you will see the app’s home screen with the basic information about your PC.
Now, click on the One-Click Care option on the left pane of the home screen and then click on Start Scan Now button.
This will begin the scanning of your entire system and will list out all the persisting, present, and hidden issues in your PC, on your app screen.
Next, click on the Clean Now button available at the bottom right corner of the screen, and wait for the issues to get sorted out.
Once the process gets completed, you will observe the faster working system that will let you do everything and will make your gameplay a graceful one, without any interruption.
Also read : windows randomly restarts
HP ranks top among the printer manufacturers in the market and excels with the performance of its printers with relatively best printing experience than other printer manufacturers. HP printers offer you to print, scan, copy, and fax your documents within a matter of minutes.
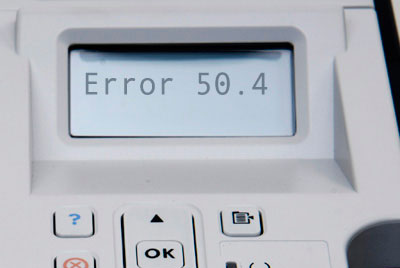
However, the printer machinery evidently breaks down after some time. HP printers may also come across certain issues hampering your work productivity as well as your valuable time. One of the issues you may run into is HP Printer 50.4 Fuser Error, displaying an error message that reads a “fuser heater wire failure.” This error occurs due to internal disruption of your printer, having caused damage to its fuser. This implies that the power supply is problematic, and you need to check it.
Read : hp laserjet 1320 driver windows 10
There are ways you can consider dealing with error 50.4. Temporarily, switching off your printer and then back on can get you out of the problem. This technique will reset your printer fuser and will let you print more. Also, in case if the error troubles you back, you can replace the fuser as a permanent fix.
What causes HP Printer 50.4 Fuser Error?The 50.4 Fuser Error is caused by various factors, including the following:
When the surrounding temperature is too high, the fuser may get damaged. As a result, Error 50.4 will start interrupting your printing.
While attempting to print unsupported media, you may have to face the 50.4 error. In such a situation, these unsupported files get enclosed in the fuser, causing error 50.4 to display on your screen.
When there is something wr
ong with your power supply, this kind of error is encountered.
A problematic windows registry may also turn out to cause a problem like this.
In an attempt to deal with 50.4 Fuser Error in your HP printer, you can take the following measures:
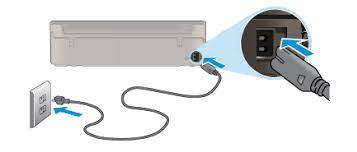
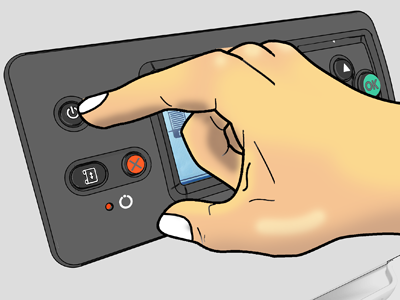
Restart your printerThe very first thing you should try not only in this case but any other printer issue is to turn your printer off, remove the power cable from the wall socket and wait for a while. Check and tighten the loose cables, if any. Then plug your printer power cable back into the wall socket tightly, and turn your printer back on.
Also, make sure to check if your printer is receiving an uninterrupted power supply.
Check the power supplyBefore connecting your printer to a wall socket, you need to make sure that the power socket is in working condition and is hassle-free. Also, while connecting the printer to a socket, plug in the power cord properly and tightly.
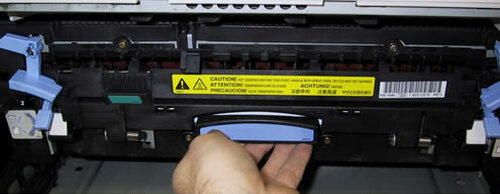
Try resetting the printer fuserIn order to reset your printer fuser, you need to follow the instructions given below:
Firstly, unplug the printer from the socket, and wait for a few seconds.
Now open the right cover of a printer, and shift the two fuser handles towards the center position.
Take your fuser out by sliding it towards the open cover.
Now, carefully check the printer if there’s any paper stuck inside.
If you see any paper or bits of paper, wipe them off gently.
Place the fuser back into the printer.
Move the fuser back to its original position.
Shut the cover you have opened.
Plug your printer power cord back in the power socket, and then turn the printer on, once again to make it work and test a printout of a document.
Also read : hp laserjet 1320 driver
Important Highlights-
Canon has announced to bring its latest Colorado 1630 UVgel Roll-to-Roll Printer.
It is a time and cost-effective printer based on UVgel technology, ideal for businesses.
It produces high-quality prints of up to 1,800 dpi and is long-lasting with an instant drying capacity.
Canon has recently announced to launch its new Colorado 1630 UVgel Roll-to-Roll Printer. The configuration for Colorado 1630 UVgel’s base model can be made as per the business requirements by adding the features like FLXfinish, a second media roll, and easy double-sided printing. This Canon printer has been structured to be resilient, consistent, and stable, all at once.
The Colorado 1630 printer by Canon offers to deliver the finest quality print of 1,800 dpi, with long-lasting, free of odor, and instant drying capability, tackle the vast available applications. Also, this printer has been designed for sign makers, PSPs, and domestic printers. It can manage to reach the speed of 1,195 square feet per hour while printing outdoor banners and billboards. Working in its high-quality mode it can attain a speed of around 312 square feet per hour.
Read : mouse lagging
This Canon printer shares its features, output quality, and flexibility with Canon’s Colorado 1650 printer, which is comparatively faster than Colorado 1630. Canon’s Colorado 1650 printer Canon’s unique UVgel 460 inks can also be imported to Colorado 1630 printer to produce finely honed printouts with a wide array of colors. It provides effortless printing with the minimized cost of printing due to its excellent efficiency, with lesser wastage and 40 percent lesser consumption of ink, compared to other technologies. This is the best way to let the customers expand their outcomes and extend their business.
The Colorado 1630 has been brought to the existing UVgel roll-to-roll printers lineup and has certainly raised Canon’s printer market. On the other hand, the Colorado 1650 is also available for customers with higher volumes as well as those with the UVgel Wallpaper Factory.
Also read : mouse freezes windows 10

Is your gaming PC messing up your gaming experience with its slow processing? It’s high time you set your gaming PC for a treatment for this uncanny behavior. Similar to any other PC, you will need to check it both externally and internally and fix the issues wherever required.
The slow processing issue in your PC may have resulted from not one but the numerous factors including dusty hardware, loosened components, years old system as the external factors and stacked memory, unworthy software and games stored, malware and viruses, and more, as the internal factors. But there’s no reason to panic as all of these factors can be worked upon using simple tricks and techniques.
Discussed below are few ways to deal with the issues in your “gaming PC” holding you away from enjoying your “PC gaming.”
Also read : Driver Printer Canon
Cleaning your SSDThe documents stacked upWhatever profession is your surviving option, your Documents folders are sure shot crammed up with the documents no matter how useful or useless they are. These documents unnecessarily populate your drive space and should be considered to be arranged, removing the futile elements you don’t require any further. Also, Drive is the better option for them to be stored where they may lie undisturbed for years. Or you can use external devices such as a USB drive to store them.
TreeSize to administer the space on your device
Using TreeSize to scan your device space
If your PC is running out of drive space, you can quickly scan and analyze what eats up most of the space on your device using TreeSize. It’s a handy tool available in its free as well as paid versions.
If you are a hardcore gamer, you may be using a SATA drive, NVMe SSD, or a hard drive. With these in use, you incessantly keep on installing more and more games so that you can play them whenever you feel like. To store these games, you need to make sure your device storage has enough space.
You certainly want to get a clear insight of the available space in your drives so as to then manage space for the forthcoming games. With TreeSizeopened, you will have the apparent picture of how much of the space has been occupied and how much more is left. All you need to do is right-click on your drives and click to open TreeSizeFreefrom the menu. You will eventually get to know what you are looking for.
Installed games
Steam storefront

You can also ensure getting rid of some of the games you may have installed for days, weeks, months, or even years and have been taking up ample space. How do you get to know about these games? Again, TreeSize is there for your assistance. Use it to get a glance at your folders containing Epic Games, Origin, Steam, Ubisoft games to know how hard your hard drive space has been consumed with the most impactful games available. Of course, some of these games may be the ones you play the most. But those lying intact can be uninstalled and reinstalled when you finally decide to actually play the games.
Images and videos
A game still

When you are a die-hard fan of PC games, you want to completely indulge in the game moments and end up accumulating a lot of images by either downloading or otherwise capturing screenshots. It’s just a matter of a moment, and then you even forget about those images and screenshots. So, it’s better to get over them as soon as possible and delete them for your betterment.
Game videos have a different fan base that keeps on watching out for the critical game moments. Not only this, but some of the enthusiasts like to download and keep the game trailers already available on YouTube. In any case, they are least required and should considerably be delete
Read more : cannon.com/ijsetup
![C:\Users\LENOVO\AppData\Local\Microsoft\Windows\Temporary Internet Files\Content.IE5\TVJL3J8H\43775361884_cccba2399e_b[1].jpg](https://lh4.googleusercontent.com/1DSPjD4v1Cs8J2kIeV1m78nfDS7VxJgar_41ji9uAL76wDSEObqykoGJtMcAwOjjDlmy7_wJ58hWMbf9IzJ6d6wQuc642ezRg-m5WVjIo-w1GBQ92dHbedvp_D4I2MBlYesW2jixleqn3bebg8NrIbedAV_mU2MGMk9hE2qT9eEnEjl0IU4qC0OnVHxJPlBojynBGMk)
True gamers cannot afford to let their PCs lag, especially when using the PCs as their game consoles. To make sure you play games without interruption, breakage, and pauses, you need to ascertain the PC optimization frequently. A well-optimized PC will not only enable you to enjoy your gaming experience but will also guarantee your PC health at par.
Manually cleaning a PC turns out really a time-consuming process. Instead, you can consider using the PC cleaner software that effortlessly will ensure your PC optimization in fewer minutes.
Read more : pc randomly restarts
Try Advanced PC Cleanup software that will completely clean your PC to uplift your PC’s health for optimal performance and an unstoppable gaming experience. The software will get your PC cleaned of junk files and other trash files, making your disc space capacious, meanwhile boosting its RAM and CPU efficiency. Additionally, you get rid of cache, cookies, and even proof of identity theft.
Moreover, it doesn’t exhaust and even lets you scan the malware, spyware, and other sorts of cyber threats on your Windows PC. Further, it adds up for speed in the startup times, deleting software as well as cleaning up the old existing downloaded files and applications.
How to use Advanced PC Cleanup App
Advanced PC Cleanup App Interface

A process of a few simple steps, Advanced PC Cleanup, comes with an interactive and spontaneous interface. You can use the software by following the instructions given below:
Firstly download the Advanced PC Cleanup software on your PC. Then, Install the software and open it.
You need to first register the application in order to activate it.
Following the activation, you will see the app’s home screen with the basic information about your PC.
Now, click on the One-Click Care option on the left pane of the home screen and then click on Start Scan Now button.
This will begin the scanning of your entire system and will list out all the persisting, present, and hidden issues in your PC, on your app screen.
Next, click on the Clean Now button available at the bottom right corner of the screen, and wait for the issues to get sorted out.
Once the process gets completed, you will observe the faster working system that will let you do everything and will make your gameplay a graceful one, without any interruption.
Also read : windows randomly restarts

HP ranks top among the printer manufacturers in the market and excels with the performance of its printers with relatively best printing experience than other printer manufacturers. HP printers offer you to print, scan, copy, and fax your documents within a matter of minutes.
However, the printer machinery evidently breaks down after some time. HP printers may also come across certain issues hampering your work productivity as well as your valuable time. One of the issues you may run into is HP Printer 50.4 Fuser Error, displaying an error message that reads a “fuser heater wire failure.” This error occurs due to internal disruption of your printer, having caused damage to its fuser. This implies that the power supply is problematic, and you need to check it.
Read : hp laserjet 1320 driver windows 10
There are ways you can consider dealing with error 50.4. Temporarily, switching off your printer and then back on can get you out of the problem. This technique will reset your printer fuser and will let you print more. Also, in case if the error troubles you back, you can replace the fuser as a permanent fix.
What causes HP Printer 50.4 Fuser Error?The 50.4 Fuser Error is caused by various factors, including the following:
When the surrounding temperature is too high, the fuser may get damaged. As a result, Error 50.4 will start interrupting your printing.
While attempting to print unsupported media, you may have to face the 50.4 error. In such a situation, these unsupported files get enclosed in the fuser, causing error 50.4 to display on your screen.
When there is something wr
ong with your power supply, this kind of error is encountered.
A problematic windows registry may also turn out to cause a problem like this.
In an attempt to deal with 50.4 Fuser Error in your HP printer, you can take the following measures:
Restart your printerThe very first thing you should try not only in this case but any other printer issue is to turn your printer off, remove the power cable from the wall socket and wait for a while. Check and tighten the loose cables, if any. Then plug your printer power cable back into the wall socket tightly, and turn your printer back on.
Also, make sure to check if your printer is receiving an uninterrupted power supply.
Check the power supplyBefore connecting your printer to a wall socket, you need to make sure that the power socket is in working condition and is hassle-free. Also, while connecting the printer to a socket, plug in the power cord properly and tightly.
Try resetting the printer fuserIn order to reset your printer fuser, you need to follow the instructions given below:
Firstly, unplug the printer from the socket, and wait for a few seconds.
Now open the right cover of a printer, and shift the two fuser handles towards the center position.
Take your fuser out by sliding it towards the open cover.
Now, carefully check the printer if there’s any paper stuck inside.
If you see any paper or bits of paper, wipe them off gently.
Place the fuser back into the printer.
Move the fuser back to its original position.
Shut the cover you have opened.
Plug your printer power cord back in the power socket, and then turn the printer on, once again to make it work and test a printout of a document.


Also read : hp laserjet 1320 driver
Every printer in the market goes through some errors or issues at some point. Well, no device can be perfect at all. Canon inc. tries their best to provide a trouble-free printing experience with their printers. However, users can face some issues regarding ink on the printer.
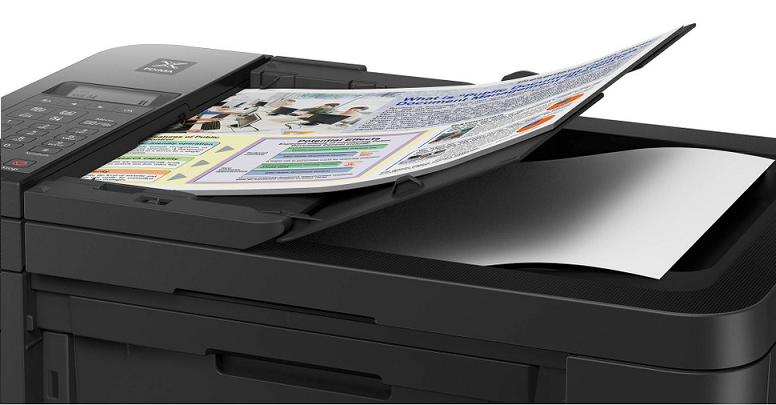
There can be two cases of such printing issues, the first is no ink on the printer page, and the second is low or faded print ink on output. If your canon printer is attempting to print, but the ink isn’t printing on the paper, then it may happen because of a few reasons such as;
There is no ink in the tank or Bubble Jet.
Clogged Printhead nozzles on the ink cartridge.
You didn’t remove the Protective cap or tape completely.
BJ cartridge replacement is needed.
Read more : How To Download Konica Minolta Printer DriversFor Windows
What’s the solution?
If your Canon printer model faces issues like no ink on printing result pages, you can go through a few processes.
Print a Nozzle Check Pattern to check printhead status
By seeing the Nozzle Check Pattern, you can confirm if the tank has enough ink and whether the ink ejects from the printhead nozzles.
Go to the MultiPASS control panel and press on the Function option.
Swipe right with the “>” and stop swap when Nozzle Check appears.
Press the Start/Copy button.
If you see Nozzle isn’t printing properly, clean the printhead at least five times.
After installing BC-21e Color BJ Cartridge, four colors will be shown – Black, Cyan, Magenta, and Yellow. A missing line is normal in colors.
How to clean PrintHead?
When you find the ink is full but not printing on paper, then you should perform printhead cleaning of Canon printer by following these steps;
Tap on Function from Canon printer display.
Swipe right until you see the “Head Cleaning” option.
Tap on “Start/Copy.”
Try these steps at least 5 to 6 times.
Again print Nozzle Check Pattern.
Replace the Cartridge or BJ Tank if you don’t see ink on the paper.
If the printhead is damaged, you can replace BC-21e Color BJ Cartridge.
How do you replace a BJ Tank in a BC-21e Color BJ Cartridge?
When you replace a BJ tank and the Canon printer is turned on, I will say, leave the BJ cartridge as it is. You can see Color Ink Empty or Black Ink Empty notice in the MultiPASS. Make sure you replace the relative ink tank.
On your Canon printer, two options appear Function and Resume and look for CARTRIDGE. Once you find it, click press this button.
Lift the Printer cover or Automatic Document Feeder.
Wait a while, and printer carriage doesn’t work.
If you see carriage is centered, locate the black BJ tank on the right and the color BJ tank on the left.
Pull the tab and discard the empty BJ tank.
Open or unbox the new BJ tank, then slide it into the empty slot.
Press on the tab until it snaps into place.
Tap on “Cartridge” and close the Printer Cover.
Perform printhead cleaning once.
Also read : How to Download Konica Printer DriverManually
How to replace the ink cartridge on the Canon printer?If there is no ink remaining or the level is low, you should replace the ink cartridge with the below steps;

Step 1- Tap on the “Cartridge” button on your Canon printer.
Step 2- Pull the Printer Cover up and wait until the carriage is centered.
Step 3- Locate the empty ink tank and unlock the cartridge by lifting the lever.
Step 4- Discard the ink cartridge from MultiPASS.
Step 5- Take out the BJ cartridge packaging.
Step 6- Slide and place the new cartridge against the holder’s back.
Step 7- Lock the cartridge by pressing down the lever.
Step 8- Tap on “Cartridge,” close the cover and perform printhead cleaning.
Try printing with a Canon printer after you perform all the above instructions. This time ink should print perfectly on your paper.
Also Read : konica minolta universal print driver

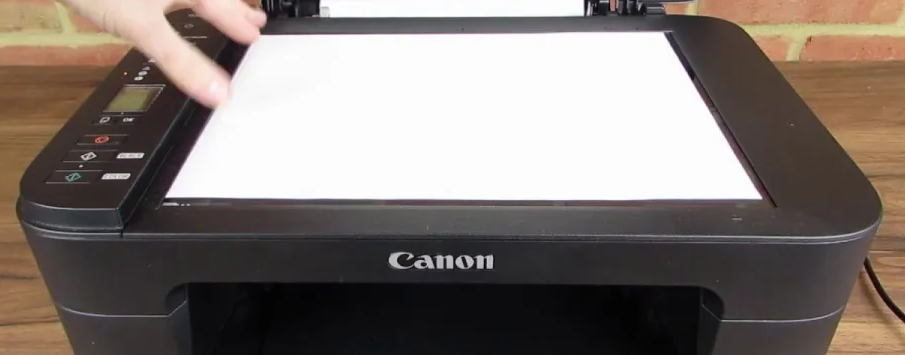
Canon printers are multi-functionality printers available to copy, scan, and even fax your documents and images, other than only print them. The Canon printers support printing from your PCs as well as other devices such as smartphones, iPads, tablets, and more. In addition, they are flexible enough to be used from any corner of your home using the wireless connectivity option it supports.
Read more : Why canon printer not detected windows 11
Troubleshooting Canon printer’s printing issues
Like any other printer, the Canon printer also comes across certain errors and issues. Its printing issue may arise due to more than one cause. One may encounter the issues such as not printing, printing blank pages, not responding, wireless printing not working, etc. Given below are some of the ways to deal with such problems in your Canon printers.
Canon IJ printer’s not printing issue
You can fix your Canon IJ printer issues using some of the simple steps mentioned below:
Firstly, you need to ensure the power supply to your printer by checking the power cord if it is connected properly or not.
To begin with the Canon IJ printer troubleshooting, press and hold the power button of your printer.
Check if the flashlight of your printer is flickering. If it is, wait for it to get lit.
Your Canon printer wire connected to your PC should not be loose. If it is, plug it in tightly.
You need to ascertain the USB cable you are using to connect to your PC and printer must be compatible with both devices.
Check for the network connections to ensure the wireless connection method of printing with your Canon IJ printer.
Make sure the papers are loaded in an arranged manner on the paper tray of your Canon printer.
You will be able to print with your device only if your printer is added to your device. If not, add your printer manually.
You must ensure the correct configuration of your Canon IJ printer to resolve not printing issue.
Also read : canon printer not responding windows 11
Canon IJ printer not responding issue
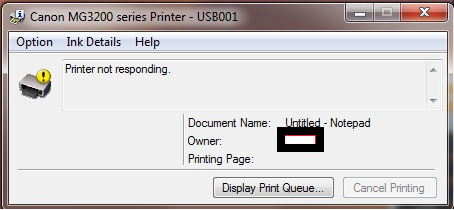
This issue arises in your Canon printers when your printer loses communication with your PC or a MAC. You can fix this issue using the steps given below:
Try resetting your PC operating system and then proceed with the printing process.
On having low signal strength, it is recommended to get your printer near your network router's range.
You can check your printer's signal strength by printing the Network Settings sheet and do the required adjustments to fix the problem.
To ensure your printer is in communication with your network router, power off your printer and router and then power on both the devices.
Try turning off the activated firewall software, which may be blocking the connection between the PC and the printer.
Check whether or not your PC and a Canon printer are connected to the same network.
Read More : Windows 11 canon printer not working
