aidenwills598's blog
sulted from numerous reasons, old drivers or malware issues being two of them. The problem, however, does not originate without its solution. Similarly, the low FPS on your gaming PC can very well be dealt with using a few sure-fire methods of optimizing your PC for the spectacular gaming experience. To make use of the benefits offered by the PC games over the consoles, you need to ensure your PC is optimized.
What is a low FPS?It’s well known that the games are projected on the screen by a fast progression of images called frames that makes them look much like videos. The frames are produced through a video card, which utilizes data from the games programs you run on your PC. While the frame rate or frame per second (FPS) is the number of frames that get displayed on your monitor in one second.
Also Read : How To Update Graphics Driver Windows
The videos normally run at around 24fps, but the games tried to be run at this rate will get you the rough and impassive, due to the phenomenon called ‘motion blur.’ A video shot at 24fps will take 24 pictures in a second meanwhile, the lens of the camera used, stay open for a longer duration that faintly blurs any moving picture. Due to this, the objects in the frame appear to move to the next frame smoothly. While video game shows the objects in their exact positions with no motion blur effect. Therefore, the objects in the game appear to jump from frame to frame.
How to increase FPS on your PC?Check out the methods below to increase the FPS of your gaming PC.
Update your PC graphics and game driver by downloading and installing the latest drivers for your graphics card.
Optimize the games’ internal settings
Reduce your monitor screen resolution
Make changes in the settings of your graphics card
Get FPS booster software for your PC to increase the FPS
Also Read : How To Update Graphics Driver
It’s your Custom Power Plan Management guide…
“Windows PC has 3 power profiles that a user can select according to the device requirement.”
Everything you should know about Windows 10 Power Plans is described in this blog.
The best news is, you don’t need to choose from the default options at all. You can customize the power options according to your requirement every time you reset your PC.
By default, every Windows PC sets the Power plan to “Balanced” one and two other plans, “Power saver” and “High performance,” are also available. We’ll discuss whether you should switch from default to another or not, or even do you need any custom plan or not?
How to switch power plans in Windows PC?
First of all, you have to check all the power plans available on your Windows device. To find these plans, follow these steps;
Open the control panel from the start menu.
Search Power Options and click to view.
You can see three options now – Balanced, Power Saver, High Performance.
Note:-
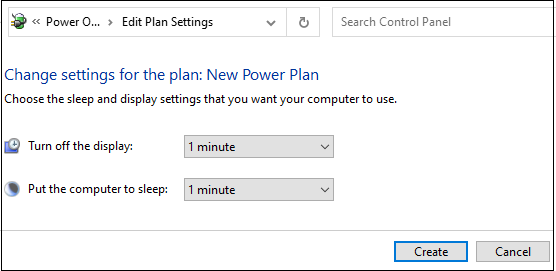
If you want to change the settings, click on the “Change Plan Settings” link of every 3 options’ top. It’ll allow you to select display turn-off time and sleep time.
You can click on Advanced Power Settings to make some other changes.
Also Read : How To Make Computer Faster
Which one should your select from three of the Power Options?
Working on a power mode is dependent on you. All three modes are well-identified under each option. Where Windows say
Balanced is recommended option that automatically balances energy consumption and increases or decreases CPU speed accordingly.
Power saver reduces
Possible performance of CPU to save energy.
High performance has more energy use as it focuses on device performance, not on saving power.
Choosing a plan for your computer is your choice; however, if you don’t switch it, the Balanced option will stay at work. The balanced power plan is perfect and default for everyone. If you want to lower the brightness, you can do it manually instead of changing a complete power plant.
A power plan is a set of system settings and hardware settings to manage your computer’s power consumption. By default, three plans are available, but you can do more than these plans. You can create a Customize power plan if you want to take control. With the specific settings, your computer will be optimized accordingly. Customization could be a better and modified way to enhance the power saving for Windows; however, if you need one or not, it’s completely your choice.
Being a PC games enthusiast, the low FPS may hamper your pleasure with a dull gaming experience. The issue may have resulted from numerous reasons, old drivers or malware issues being two of them. The problem, however, does not originate without its solution. Similarly, the low FPS on your gaming PC can very well be dealt with using a few sure-fire methods of optimizing your PC for the spectacular gaming experience. To make use of the benefits offered by the PC games over the consoles, you need to ensure your PC is optimized.
What is a low FPS?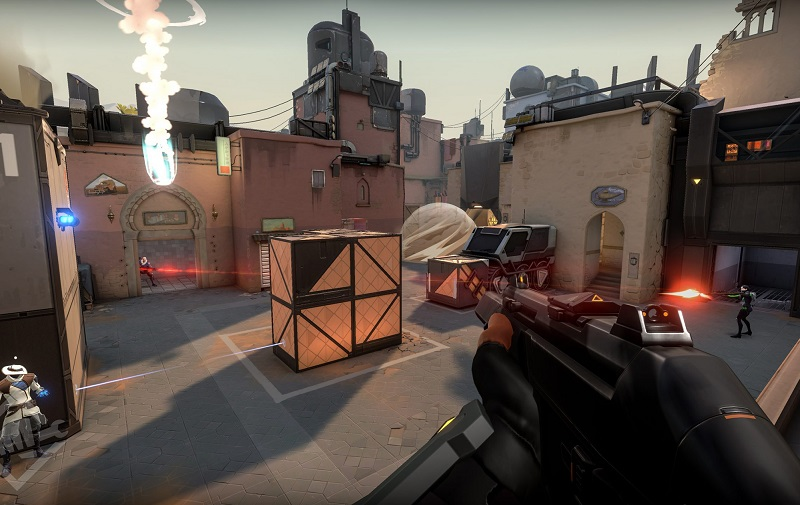
It’s well known that the games are projected on the screen by a fast progression of images called frames that makes them look much like videos. The frames are produced through a video card, which utilizes data from the games programs you run on your PC. While the frame rate or frame per second (FPS) is the number of frames that get displayed on your monitor in one second.
Also Read : How To Update Graphics Driver Windows
The videos normally run at around 24fps, but the games tried to be run at this rate will get you the rough and impassive, due to the phenomenon called ‘motion blur.’ A video shot at 24fps will take 24 pictures in a second meanwhile, the lens of the camera used, stay open for a longer duration that faintly blurs any moving picture. Due to this, the objects in the frame appear to move to the next frame smoothly. While video game shows the objects in their exact positions with no motion blur effect. Therefore, the objects in the game appear to jump from frame to frame.
How to increase FPS on your PC?Check out the methods below to increase the FPS of your gaming PC.
Update your PC graphics and game driver by downloading and installing the latest drivers for your graphics card.
Optimize the games’ internal settings
Reduce your monitor screen resolution
Make changes in the settings of your graphics card
Get FPS booster software for your PC to increase the FPS
Also Read : How To Update Graphics Driver
It’s your Custom Power Plan Management guide…
“Windows PC has 3 power profiles that a user can select according to the device requirement.”

Everything you should know about Windows 10 Power Plans is described in this blog.
The best news is, you don’t need to choose from the default options at all. You can customize the power options according to your requirement every time you reset your PC.
By default, every Windows PC sets the Power plan to “Balanced” one and two other plans, “Power saver” and “High performance,” are also available. We’ll discuss whether you should switch from default to another or not, or even do you need any custom plan or not?
How to switch power plans in Windows PC?
First of all, you have to check all the power plans available on your Windows device. To find these plans, follow these steps;
Open the control panel from the start menu.
Search Power Options and click to view.
You can see three options now – Balanced, Power Saver, High Performance.
Note:-
If you want to change the settings, click on the “Change Plan Settings” link of every 3 options’ top. It’ll allow you to select display turn-off time and sleep time.
You can click on Advanced Power Settings to make some other changes.
Also Read : How To Make Computer Faster
Which one should your select from three of the Power Options?
Working on a power mode is dependent on you. All three modes are well-identified under each option. Where Windows says;

Balanced is recommended option that automatically balances energy consumption and increases or decreases CPU speed accordingly.
Power saver reduces
Possible performance of CPU to save energy.
High performance has more energy use as it focuses on device performance, not on saving power.
Choosing a plan for your computer is your choice; however, if you don’t switch it, the Balanced option will stay at work. The balanced power plan is perfect and default for everyone. If you want to lower the brightness, you can do it manually instead of changing a complete power plant.
Do you need a customized power plan?
A power plan is a set of system settings and hardware settings to manage your computer’s power consumption. By default, three plans are available, but you can do more than these plans. You can create a Customize power plan if you want to take control. With the specific settings, your computer will be optimized accordingly. Customization could be a better and modified way to enhance the power saving for Windows; however, if you need one or not, it’s completely your choice.
How do you create a power plan in Windows 10?
To create a new customize power plan in your Windows 10 PC, you can go through the below-mentioned process;
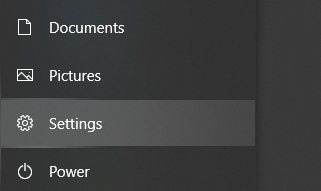
First of all, go to the start menu or press the Windows button.

Secondly, click on the setting icon from the left side.

Now, click on the System option.

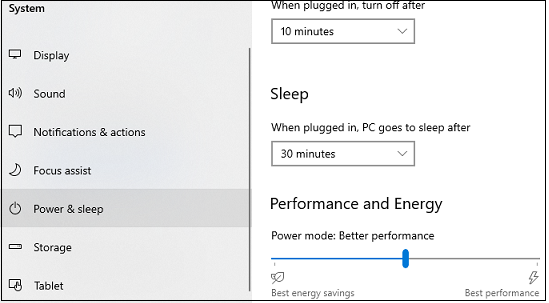
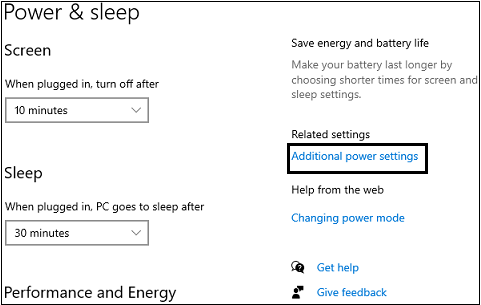
Then, select Power & Sleep from the left taskbar.

Click “Additional power settings” under Related settings on the right side.

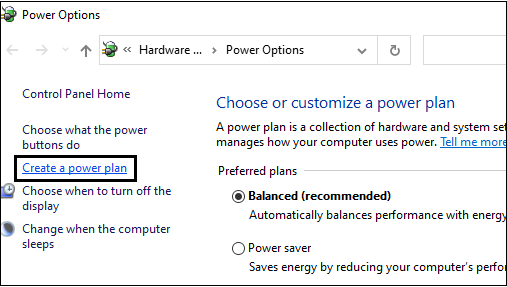
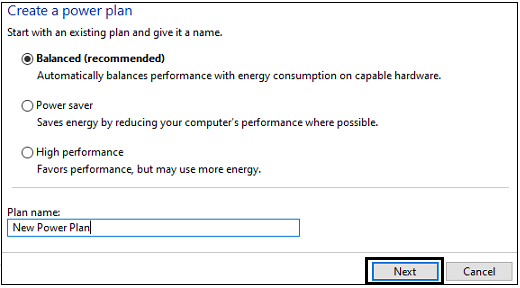
Click on the Create a power plan link from the left.

At the bottom, enter a name for the new plan and click Next.

Customize the time according to your choice and click Create.
Your power plan starts running.

Note: - If you don’t want to go longer using this process, you can simply search “Choose a power plan” in the start menu and open the application displaying results. Then follow step 6 and further to create the new customize plan.
Also Read : How To Speed Up Computer
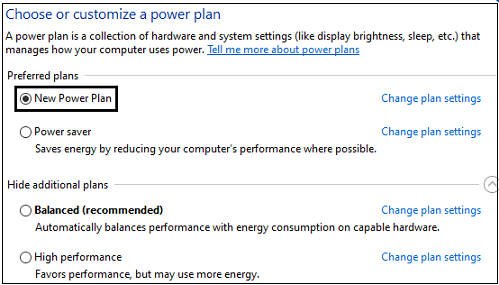
Customizing a Power Plan
If you want to customize the recently created power plan, open the “Choose a power plan” from the Windows menu and click “Change plan settings” on your custom power plan. Thereafter, click on the “Change advanced power settings” link and change settings like Hard Disk, Internet Explorer, to reflect on your PC. Then click “Apply” and OK to finish the customization.
How to delete a custom power plan
If your mind changes somehow, and now you wish to delete the custom power plan, you can easily do it. Let’s see how;
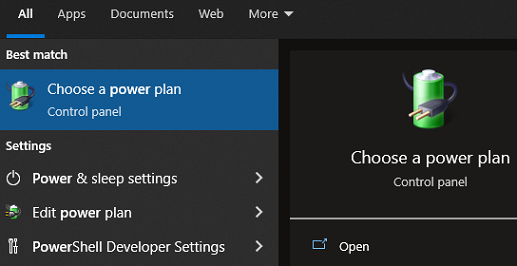
In the windows start menu, search for Choose a power plan.

Open Power plan (control panel), and you’ll see all power plans.
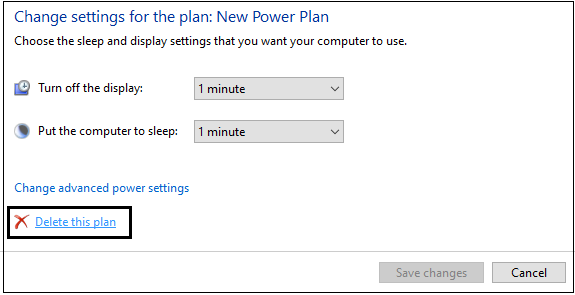
Now, select another power plan other than the one you want to delete. The currently running power plan won’t show you the delete option; hence, you must tick on another plan.
Then, move with the Change plan settings.

Click on Delete this plan and hit OK for confirmation.
Your plan has been deleted successfully.
FAQs - Can I use another app to save your system power?
There are multiple power-saving applications available in the market. Your PC already have options to customize power plans; however, in some situations, when the system is working in High performance or even using WiFi, USB input, these default setting may not save your device energy.
Taking this seriously, you can install any power-saving application but make sure the app should be secure. You also can install PC Cleaner Pro from our store that’ll save your device battery and take care of many other files, data and software.

Important Highlights-
Google is getting its image search tool Google Lens updated with new AI-powered language features.
Now users can search for visuals adding the text to specify the required search result.
Read Also : Google Chrome Crashing
Google is on the verge of getting its image search tool Google Lens updated with new AI-powered language features. With this unique ability, the users can further their searches using text. For instance, on clicking a picture of a product on Google lens, you will be shown similar products in the search results, and you can now add text to specify your requirement concerning the clicked product.
Furthermore, Google is also launching an all-new “Lens mode” option in the iOS Google app, with which users will be able to search an image on the web. The option will soon be rolled out and will be limited to users in the US. Besides, Google Lens has also been launched for desktops within the Chrome browser, where users will be able to select any image or any visual while browsing the web without having to leave the tab. The feature will soon be available around the world.
The updates are Google’s effort to improve the existing search options using AI language understanding. Moreover, these updates are supported by a machine learning model revealed by the company at I/O named MUM earlier this year. Along with the mentioned features, Google is also bringing new AI-powered tools to its web browsing and mobile searches.
Google seeks to convert its Lens updates using AI into a handier tool. This will allow you to click an image and search by adding text to get more information related to it.
Read Also : Google Chrome Crashing windows 10
Google pops up with lots of examples related to your image search, and they appear to be simple and useful. Now, one and all can update the Google Lens to check what AI language understanding has enabled in the feature for its visual search.
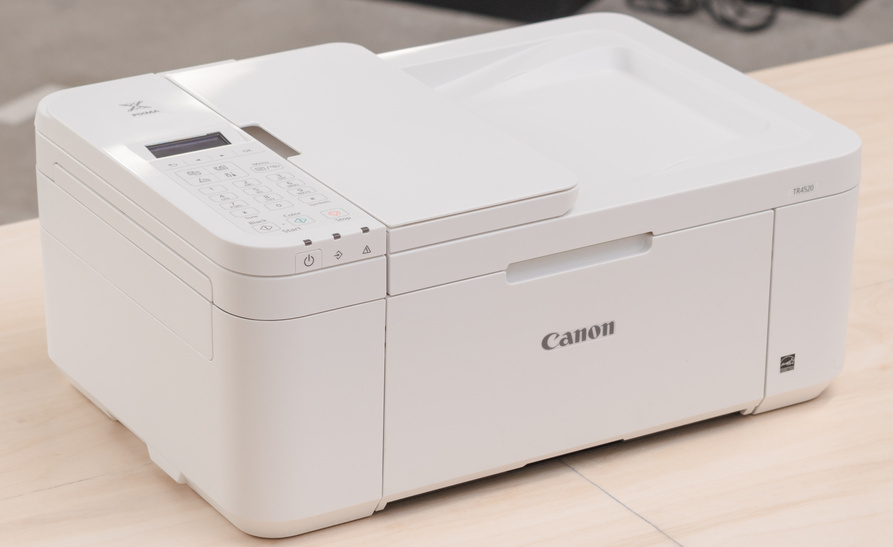
Enjoying vast popularity in the world, Canon printers have acquired up to 17 percent of the market share in the year 2020-2021. What do you think makes it such a popular printer brand? The features! Canon printers are versatile printers available to perform functions, including printing, scanning, copying, and more. Moreover, Canon is counted among the reliable printer brands available around the world.
However, despite the reliability, Canon printers may sometimes get weariness in their components and parts featured in them. Its machinery gets impacted due to various factors and results in the issues in its printing in the various forms.
One such issue includes the Canon Printer Not Printing Black Issue in which your printer is reluctant to print black ink onto your printed documents.
Read Also : Printer Printing Blank Pages
Reasons for Canon Printer Not Printing Black IssueSome of the primary causes of Canon printer not printing black error include the following:
Sometimes when you have not been using your printer for several days, that’s when your ink cartridge may end up drying, or specifically black ink.
Also, some of the times the cartridge has liquid ink while your printer attempts to execute the printing with the dried-up print head, with no output on the paper.
Also, your ink cartridge may turn out to be the culprit causing this type of error.
Using an outdated version of the Canon printer may also be one reason for the Canon printer not printing black issue
This issue can be gotten rid of using the following techniques:
Clean your printerYou may possibly get away without having to try any tricky technical solution to deal with the Canon printer not printing black error. All you need to do is open your printer and clean in detail each of its parts, internally as well as externally. To do this, follow the steps given below:
Firstly, open your printer.
Ensure loading your paper tray with at least 5 or more A4 size papers.
Pull out the output tray along with its extension.
Go to the Setup option to start cleaning your printer.
In the setup screen, click on the tools icon.
Scroll through the Toolbox to locate Maintenance Menu, and then press OK.
The Maintenance Menu opens up. Here, select Deep Cleaning and then press OK.
Select Yes to confirm the cleaning and continue by pressing OK.
This will get the printer to start cleaning. Once the process gets completed, restart your printer to check if the issue has gone.

If you are currently using a duplicate ink cartridge in your printer, you may come across the Canon printer not printing black error. It’s because Canon does not guarantee the use of ink cartridge replica to be productive enough to serve your purpose. Therefore, if there is a duplicate cartridge in your printer, replace it with the original one, immediately.
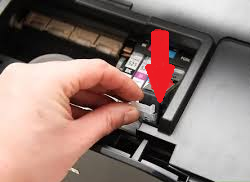
Replace the problematic cartridgesThis process includes three ways-
Find the replaceable cartridgeCheck out the color blacks on the test print results. If you see anything problematic, your black ink cartridge is in problem.
Read Also : My Printer Is Printing Blank Pages
Replace the cartridge with issues
Put some papers on the paper loader tray.
Turn your printer on.
Now check the ink cartridge door.
Remove the cartridge carefully.
Now remove the seal from the new cartridge
Insert the new cartridge into the ink nozzles.
Adjust the cartridge in its slot until you hear a click sound.
Once installed, close the cartridge door.
Turn your printer on ensuring there are papers in the tray.
Click the Next button to open Set Up.
Open the tools using the right arrow, and click OK to continue. The printer alignment page opens up.
Close the lid and then press the OK button to successfully align your printer.
Wait until your printer scans the alignment sheet to complete the process.
Most of your printer problems may arise due to an outdated or corrupted printer driver on your system. Therefore, you need to check whether the driver you are currently using is updated or not. If it is outdated, update your driver immediately. For this, you can visit Canon’s website and find and download the suitable driver for your Canon printer model.
Being a PC games enthusiast, the low FPS may hamper your pleasure with a dull gaming experience. The issue may have resulted from numerous reasons, old drivers or malware issues being two of them. The problem, however, does not originate without its solution. Similarly, the low FPS on your gaming PC can very well be dealt with using a few sure-fire methods of optimizing your PC for the spectacular gaming experience. To make use of the benefits offered by the PC games over the consoles, you need to ensure your PC is optimized.
What is a low FPS?
It’s well known that the games are projected on the screen by a fast progression of images called frames that makes them look much like videos. The frames are produced through a video card, which utilizes data from the games programs you run on your PC. While the frame rate or frame per second (FPS) is the number of frames that get displayed on your monitor in one second.
Also Read : How To Update Graphics Driver Windows
The videos normally run at around 24fps, but the games tried to be run at this rate will get you the rough and impassive, due to the phenomenon called ‘motion blur.’ A video shot at 24fps will take 24 pictures in a second meanwhile, the lens of the camera used, stay open for a longer duration that faintly blurs any moving picture. Due to this, the objects in the frame appear to move to the next frame smoothly. While video game shows the objects in their exact positions with no motion blur effect. Therefore, the objects in the game appear to jump from frame to frame.
How to increase FPS on your PC?Check out the methods below to increase the FPS of your gaming PC.
Update your PC graphics and game driver by downloading and installing the latest drivers for your graphics card.
Optimize the games’ internal settings
Reduce your monitor screen resolution
Make changes in the settings of your graphics card
Get FPS booster software for your PC to increase the FPS
Also Read : How To Update Graphics Driver
It’s your Custom Power Plan Management guide…
“Windows PC has 3 power profiles that a user can select according to the device requirement.”

Everything you should know about Windows 10 Power Plans is described in this blog.
The best news is, you don’t need to choose from the default options at all. You can customize the power options according to your requirement every time you reset your PC.
By default, every Windows PC sets the Power plan to “Balanced” one and two other plans, “Power saver” and “High performance,” are also available. We’ll discuss whether you should switch from default to another or not, or even do you need any custom plan or not?
How to switch power plans in Windows PC?
First of all, you have to check all the power plans available on your Windows device. To find these plans, follow these steps;
Open the control panel from the start menu.
Search Power Options and click to view.
You can see three options now – Balanced, Power Saver, High Performance.
Note:-
If you want to change the settings, click on the “Change Plan Settings” link of every 3 options’ top. It’ll allow you to select display turn-off time and sleep time.
You can click on Advanced Power Settings to make some other changes.
Also Read : How To Make Computer Faster
Which one should your select from three of the Power Options?
Working on a power mode is dependent on you. All three modes are well-identified under each option. Where Windows says;
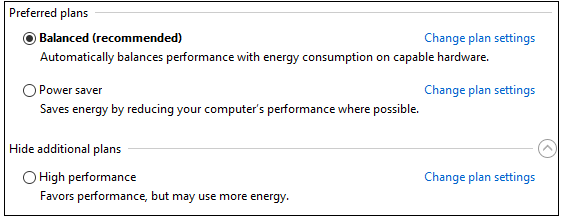
Balanced is recommended option that automatically balances energy consumption and increases or decreases CPU speed accordingly.
Power saver reduces
Possible performance of CPU to save energy.
High performance has more energy use as it focuses on device performance, not on saving power.
Choosing a plan for your computer is your choice; however, if you don’t switch it, the Balanced option will stay at work. The balanced power plan is perfect and default for everyone. If you want to lower the brightness, you can do it manually instead of changing a complete power plant.
Do you need a customized power plan?
A power plan is a set of system settings and hardware settings to manage your computer’s power consumption. By default, three plans are available, but you can do more than these plans. You can create a Customize power plan if you want to take control. With the specific settings, your computer will be optimized accordingly. Customization could be a better and modified way to enhance the power saving for Windows; however, if you need one or not, it’s completely your choice.
How do you create a power plan in Windows 10?
To create a new customize power plan in your Windows 10 PC, you can go through the below-mentioned process;
First of all, go to the start menu or press the Windows button.

Secondly, click on the setting icon from the left side.
Now, click on the System option.

Then, select Power & Sleep from the left taskbar.
Click “Additional power settings” under Related settings on the right side.
Click on the Create a power plan link from the left.
At the bottom, enter a name for the new plan and click Next.
Customize the time according to your choice and click Create.

Your power plan starts running.
Note: - If you don’t want to go longer using this process, you can simply search “Choose a power plan” in the start menu and open the application displaying results. Then follow step 6 and further to create the new customize plan.
Also Read : How To Speed Up Computer
Customizing a Power Plan
If you want to customize the recently created power plan, open the “Choose a power plan” from the Windows menu and click “Change plan settings” on your custom power plan. Thereafter, click on the “Change advanced power settings” link and change settings like Hard Disk, Internet Explorer, to reflect on your PC. Then click “Apply” and OK to finish the customization.
How to delete a custom power plan
If your mind changes somehow, and now you wish to delete the custom power plan, you can easily do it. Let’s see how;
In the windows start menu, search for Choose a power plan.
Open Power plan (control panel), and you’ll see all power plans.
Now, select another power plan other than the one you want to delete. The currently running power plan won’t show you the delete option; hence, you must tick on another plan.
Then, move with the Change plan settings.
Click on Delete this plan and hit OK for confirmation.
Your plan has been deleted successfully.
Google is getting its image search tool Google Lens updated with new AI-powered language features.
Now users can search for visuals adding the text to specify the required search result.
Read Also : Google Chrome Crashing
Google is on the verge of getting its image search tool Google Lens updated with new AI-powered language features. With this unique ability, the users can further their searches using text. For instance, on clicking a picture of a product on Google lens, you will be shown similar products in the search results, and you can now add text to specify your requirement concerning the clicked product.
Furthermore, Google is also launching an all-new “Lens mode” option in the iOS Google app, with which users will be able to search an image on the web. The option will soon be rolled out and will be limited to users in the US. Besides, Google Lens has also been launched for desktops within the Chrome browser, where users will be able to select any image or any visual while browsing the web without having to leave the tab. The feature will soon be available around the world.
The updates are Google’s effort to improve the existing search options using AI language understanding. Moreover, these updates are supported by a machine learning model revealed by the company at I/O named MUM earlier this year. Along with the mentioned features, Google is also bringing new AI-powered tools to its web browsing and mobile searches.
Google seeks to convert its Lens updates using AI into a handier tool. This will allow you to click an image and search by adding text to get more information related to it.
Read Also : Google Chrome Crashing windows 10
Google pops up with lots of examples related to your image search, and they appear to be simple and useful. Now, one and all can update the Google Lens to check what AI language understanding has enabled in the feature for its visual search.
Enjoying vast popularity in the world, Canon printers have acquired up to 17 percent of the market share in the year 2020-2021. What do you think makes it such a popular printer brand? The features! Canon printers are versatile printers available to perform functions, including printing, scanning, copying, and more. Moreover, Canon is counted among the reliable printer brands available around the world.
However, despite the reliability, Canon printers may sometimes get weariness in their components and parts featured in them. Its machinery gets impacted due to various factors and results in the issues in its printing in the various forms.
One such issue includes the Canon Printer Not Printing Black Issue in which your printer is reluctant to print black ink onto your printed documents.
Read Also : Printer Printing Blank Pages
Reasons for Canon Printer Not Printing Black IssueSome of the primary causes of Canon printer not printing black error include the following:
Sometimes when you have not been using your printer for several days, that’s when your ink cartridge may end up drying, or specifically black ink.
Also, some of the times the cartridge has liquid ink while your printer attempts to execute the printing with the dried-up print head, with no output on the paper.
Also, your ink cartridge may turn out to be the culprit causing this type of error.
Using an outdated version of the Canon printer may also be one reason for the Canon printer not printing black issue
This issue can be gotten rid of using the following techniques:
Clean your printerYou may possibly get away without having to try any tricky technical solution to deal with the Canon printer not printing black error. All you need to do is open your printer and clean in detail each of its parts, internally as well as externally. To do this, follow the steps given below:
Firstly, open your printer.
Ensure loading your paper tray with at least 5 or more A4 size papers.
Pull out the output tray along with its extension.
Go to the Setup option to start cleaning your printer.
In the setup screen, click on the tools icon.
Scroll through the Toolbox to locate Maintenance Menu, and then press OK.
The Maintenance Menu opens up. Here, select Deep Cleaning and then press OK.
Select Yes to confirm the cleaning and continue by pressing OK.
This will get the printer to start cleaning. Once the process gets completed, restart your printer to check if the issue has gone.
If you are currently using a duplicate ink cartridge in your printer, you may come across the Canon printer not printing black error. It’s because Canon does not guarantee the use of ink cartridge replica to be productive enough to serve your purpose. Therefore, if there is a duplicate cartridge in your printer, replace it with the original one, immediately.
Replace the problematic cartridgesThis process includes three ways-
Find the replaceable cartridgeCheck out the color blacks on the test print results. If you see anything problematic, your black ink cartridge is in problem.
Read Also : My Printer Is Printing Blank Pages
Replace the cartridge with issues
Put some papers on the paper loader tray.
Turn your printer on.
Now check the ink cartridge door.
Remove the cartridge carefully.
Now remove the seal from the new cartridge
Insert the new cartridge into the ink nozzles.
Adjust the cartridge in its slot until you hear a click sound.
Once installed, close the cartridge door.
Turn your printer on ensuring there are papers in the tray.
Click the Next button to open Set Up.
Open the tools using the right arrow, and click OK to continue. The printer alignment page opens up.
Close the lid and then press the OK button to successfully align your printer.
Wait until your printer scans the alignment sheet to complete the process.
Most of your printer problems may arise due to an outdated or corrupted printer driver on your system. Therefore, you need to check whether the driver you are currently using is updated or not. If it is outdated, update your driver immediately. For this, you can visit Canon’s website and find and download the suitable driver for your Canon printer model.
